Sentiment analysis is a Natural Language Processing (NLP) technique which consists of identifying the emotional tone behind a body of text. This analysis can be applied to multiple contexts such as product review, public opinion, social media polarity, and even support ticket satisfaction measurement.
Sentiment Analysis can be performed using Machine Learning algorithms, computational linguistics, or a combination of both. Several libraries can be used to achieve this task, the most popular being VADER, TextBlob, SpaCy and Flair, and transformer ML models such as GPT, Google’s BERT, RoBERTa and XLNet.
In this 5-piece Portfolio Project, we’ll build an end-to-end Sentiment Analysis application including a GUI, two NLP models, a wide variety of options for analysis, and multiple user-level customizations.
We’ll divide the segments as follows:
- Architecture design, environment & dependencies management, UI concept and GUI implementation.
- Data preprocessing, model implementation and model execution.
- Analysis design and implementation.
- Analysis writing.
- Results interpretation.
The complete project, including all the resources used, can be found in the Portfolio Project Repo.
Preface
Sentiment Analysis methods can provide insight regarding the tone, polarity, subjectivity and most prevalent parts of speech of a given text. We can create and train our own model from scratch, use a pre-trained one out of the box, perform transfer learning on a pre-trained model with our datasets, or use a rule-based approach where no ML model is required.
1. Machine Learning approaches
As mentioned, sentiment analysis can be achieved using Machine Learning models. If we think in simple terms, extracting sentiment out of text can be modeled as a classification problem.
Let us illustrate this with an example where we have a set of movie reviews we would like to classify as positive, neutral or negative:
A riotous film that finds depth, clarity and refreshment in even the shallowest of pools.
It would be a disservice to consider this generous film a mere homage.
In general terms, we would preprocess our text data, extract relevant features, train our classification model with labelled data and use our trained model to predict the sentiment of future data sets:
Data preprocessing: The text data is preprocessed by removing stop words and special characters and converting it to lowercase to reduce noise in the dataset:
- Original text: A riotous film that finds depth, clarity and refreshment in even the shallowest of pools.
- Preprocessed text: riotous film finds depth clarity refreshment even shallowest pools.
Tokenization: Before we pass our sentences to the model, we must also tokenize them, meaning breaking the sentence into tokens consisting of smaller sentences, phrases, symbols or words. Our tokenized sentences would look something like such:
rev_1 = ['riotous',
         'film',
         'finds',
         'depth',
         'clarity',
         'refreshment',
         'even',
         'shallowest',
         'pools']

rev_2 = ['would',
         'disservice',
         'consider',
         'generous',
         'film',
         'mere',
         'homage']
Feature extraction: The tokenized text is transformed into a numerical representation of features the model can understand. We can use techniques such as bag-of-words (BOW), n-grams, and word embeddings.
The bag-of-words approach considers a vocabulary of all the unique words in the dataset and represents each review as a vector of word counts:
| Review | rev_1 | rev_2 |
|---|---|---|
| riotous | 1 | 0 |
| film | 1 | 1 |
| finds | 1 | 0 |
| depth | 1 | 0 |
| clarity | 1 | 0 |
| refreshment | 1 | 0 |
| even | 1 | 0 |
| shallowest | 1 | 0 |
| pools | 1 | 0 |
| would | 0 | 1 |
| disservice | 0 | 1 |
| consider | 0 | 1 |
| generous | 0 | 1 |
| mere | 0 | 1 |
| homage | 0 | 1 |
Model training: We now train our sentiment analysis model with previously labelled data, where each text sample (in this case, a word) is associated with a sentiment label (e.g. positive, neutral or negative). An example of a simple set of labelled words could consist of the following:
| Word | Label |
|---|---|
| riotous | Negative |
| film | Neutral |
| finds | Neutral |
| depth | Neutral |
| clarity | Positive |
| refreshment | Positive |
| even | Neutral |
| shallowest | Negative |
| pools | Neutral |
| would | Neutral |
| disservice | Negative |
| consider | Neutral |
| generous | Positive |
| mere | Neutral |
| homage | Positive |
Since we want to calculate a score for the entire sentence, labels are usually expressed numerically instead of textually Positive, Neutral or Negative. We could, for example, define a vector ![[-1, 0, 1]](https://pabloagn.com/wp-content/ql-cache/quicklatex.com-8d4688abe0f0417a484391f9b4ba581b_l3.png "Rendered by QuickLaTeX.com") , representing each label.
, representing each label.
Model testing and validation: The trained model is tested and validated on a separate dataset to evaluate its performance. The model’s performance is measured using accuracy, precision, recall, and F1 score metrics.
Prediction: Once the model is trained and validated, it can be used to make predictions on new text data. Based on the learned patterns and features, the model will analyze the text and classify it as positive, negative, or neutral sentiment.
This was a simplified example, but in reality, ML models such as transformer models make associations between words to understand the context of a sentence or paragraph by grouping words using Part of Speech (POS) tags or other attributes; this technique is called lemmatization and is highly relevant in NLP; even though both of the reviews we used were very positive, there were some words tagged as Negative (e.g. disservice, riotous), so the final score would not be 100% Positive.
There are a wide variety of models we can use:
- Supervised Learning
- Naïve Bayes Classifier (NBC)
- Support Vector Machines (SVM)
- Logistic Regression (LR)
- Random Forest Classifier (RFC)
- Deep Learning
- Convolutional Neural Networks (CNN)
- Recurrent Neural Networks (RNN)
- Deep Belief Networks (DBN)
- Long-Short Term Memory (LSTM)
Most available pre-trained large models already offer outstanding performance in terms of social media and product review analysis out of the box. On top of that, there are thousands of variations for each existing large model; there are multiple forks containing tuned pre-trained models specific for a given application, such as Twitter polarity analysis or IMDB movie rating analysis.
2. Rule-based approaches
As its name suggests, the rule-based approach follows predefined, hardcoded rules to classify the text’s sentiment. The result is a set of rules based on which the text is labelled as positive/neutral/negative. These rules are also known as lexicons; hence the Rule-based approach is also called Lexicon-based approach.
Upon performing the sentiment analysis on a sentence or paragraph, each word is scored, and a final score is calculated based on the frequency of each word.
In general, a rule-based approach follows similar initial steps to an ML approach, the most significant difference being there’s no model to train, test and validate: We preprocess the text, tokenize it, enrich it with part of speech (POS) tagging, and classify it according to a set of predefined rules; it’s essentially a more straightforward process.
The major disadvantage of this approach is that most libraries cannot contextualize sentences or paragraphs; the final score is given by the cumulative score of each word without considering the context.
Still, rule-based algorithms have proven extremely useful and offer accurate results, with a low amount of effort required in terms of their implementation.
There are two main libraries for performing sentiment analysis using rule-based approaches:
- VADER (Valence Aware Dictionary for Sentiment Reasoning)
- TextBlob
Concept Design
We want to design an easy-to-use Guided User Interface that allows users to analyze sentiment on one or more datasets. We also want to include deeper analysis capabilities and results exporting so that the user can visualize the results textually and graphically.
1. GUI
The Guided User Interface should include the following:
- Option to bulk-download datasets from a list of URLs provided by the user or bulk-read existing datasets.
- Option to perform sentiment analysis for a user-selected column of a given dataset using two different models.
- Option to include up to 4 additional columns to perform deeper analyses.
- Option to include a Rating column to compare sentiment analysis results with actual ratings.
- Option to export results using four different formats:
- Technical: In-depth analysis including plots and Excel files with results
- Business: Business-like presentation including plots and Excel files.
- Visual: All plots from Technical and Business, without the Excel files.
- Complete: All plots and Excel files.
- Option to perform in-depth POS analysis correlating POS tags with sentiment scores.
- Option to customize the colour scheme and transparency for generated plots.
Apart from the main components, we should also include the following:
- A Help popup window containing operation instructions.
- An About popup window containing information related to the project.
- An Appearance Mode menu for selecting System, Light, or Dark.
- A text prompt informing the user about the current progress.
- Progress bars for each step of the process.
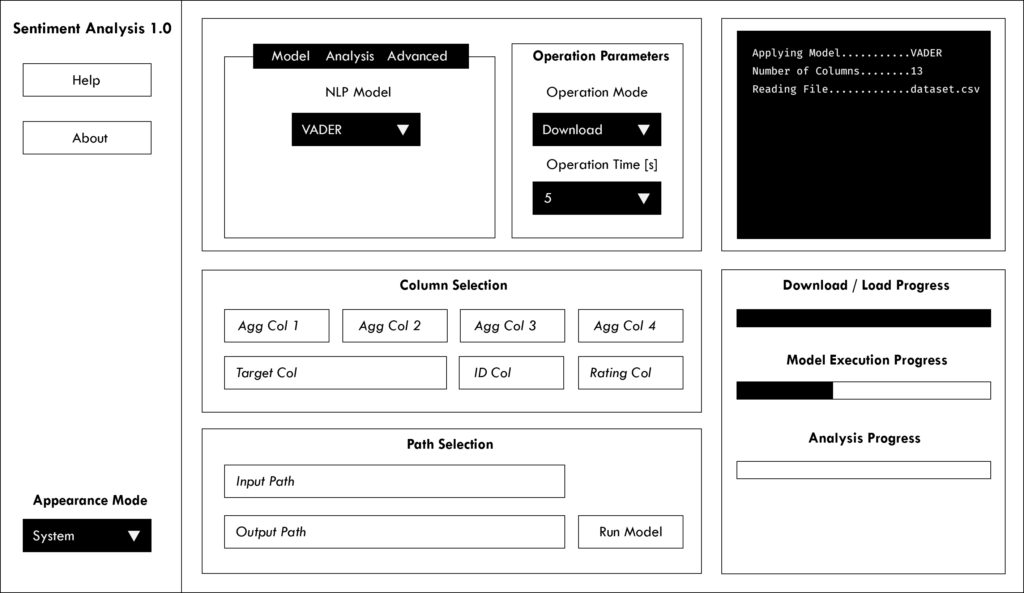
In the end, we are looking for an interface like the sketch below:
2. Data preprocessing
Let us consider an Amazon reviews dataset for the “Watches” category, where we have the following structure:
Table 3: Example Amazon Watches Review Dataset
In a given execution, we can allocate columns as follows:
- ID Column:
review_id - Rating Column:
star_rating - Agg Column 1:
verified_purchase - Agg Column 2:
helpful_votes - Agg Column 3:
total_votes - Agg Column 4:
vine - Target Column:
review_body
We will need to convert entries to appropriate data types and extract the columns of interest.
3. Models
For this project, we will implement both VADER and TextBlob as options for the user.
VADER is a lexicon and rule-based sentiment analysis tool attuned explicitly to sentiments expressed in social media.
VADER accepts a string (word, sentence, paragraph, or document) as input and returns four scores:
- Positiveness probability
![[0,1]](https://pabloagn.com/wp-content/ql-cache/quicklatex.com-470b10051abd10670d1ae6c40ae4fa5b_l3.png "Rendered by QuickLaTeX.com")
- Neutrality probability
- Negativity probability
- Compound score
![[-1, 1]](https://pabloagn.com/wp-content/ql-cache/quicklatex.com-2da316a735c8aff0ede4079c569f652b_l3.png "Rendered by QuickLaTeX.com")
TextBlob is a library for processing textual data. It provides a simple API for diving into common natural language processing (NLP) tasks such as part-of-speech tagging, noun phrase extraction, sentiment analysis, classification, translation, and more.
The TextBlob sentiment method accepts a textblob.blob.TextBlob object containing a string (word, sentence, paragraph, or document) as input and returns a tuple of two scores:
- Polarity
- Subjectivity
The advantage of these two models is that both output a polarity score in the same scale , meaning we can use all analyses for both cases without rescaling or normalizing the results. Also, the range is continuous and can be used to perform correlational studies with other continuous variables selected by the user.
4. Results & analysis
The results & analysis section will consist of two main parts:
- Apply custom analysis based on user selection.
- Write analysis results either to Excel worksheets or as plots.
4.1 Main results
Both VADER & TextBlob implementations have similar outputs. Still, there are some differences. We need to homogenize the results for both models to apply the same analysis, no matter the case.
Consequently, we will stick with the compound score (compound for VADER, polarity for TextBlob) for both cases and ditch the rest of the scores since they are unfamiliar to both models.
Thus, a typical output with sentiment analysis using the VADER model would look like such:
Table 4: Example Amazon Watches Review Analysis
4.2 Analysis
We want to implement the following analyses:
- Raw compound score aggregated by columns selected by the user per dataset:
- Mean
- Standard Deviation
- Rating (provided by the user) aggregated by columns selected by the user per dataset:
- Mean
- Standard Deviation
- Polarity percentages based on compound score per dataset:
- Positive

- Neutral

- Negative

- Positive
- Full statistical description of the compound score per dataset:
- Median
- Mean
- Standard Deviation
- Min Value
- First Quartile
- Second Quartile
- Third Quartile
- Max Value
- Spearman Rank Correlation Coefficient (Rating vs. scaled compound score)
- Spearman Rank Correlation P-Value (Rating vs. scaled compound score)
- Pearson Correlation Coefficient (Rating vs. scaled compound score)
- Pearson Correlation P-Value (Rating vs. scaled compound score)
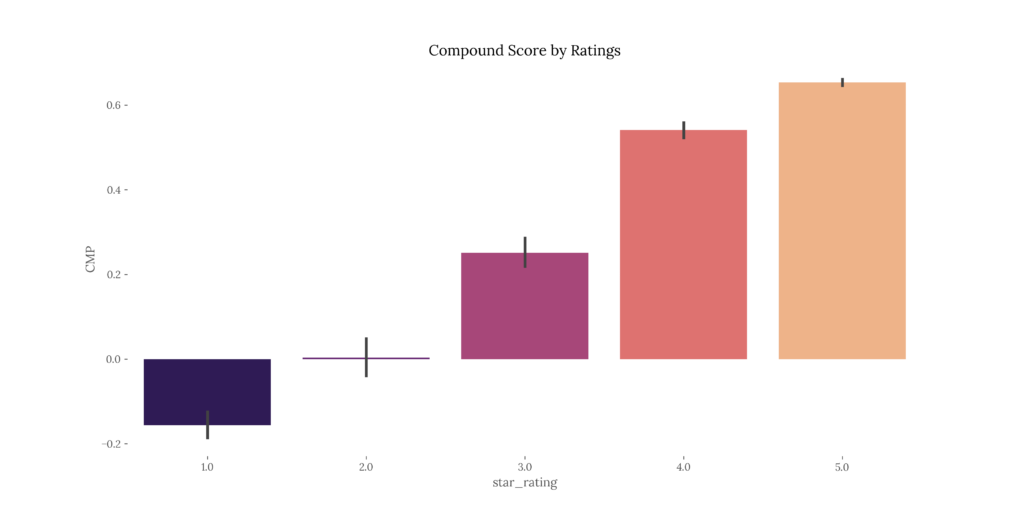
- Boxplot of the compound score by ratings per dataset
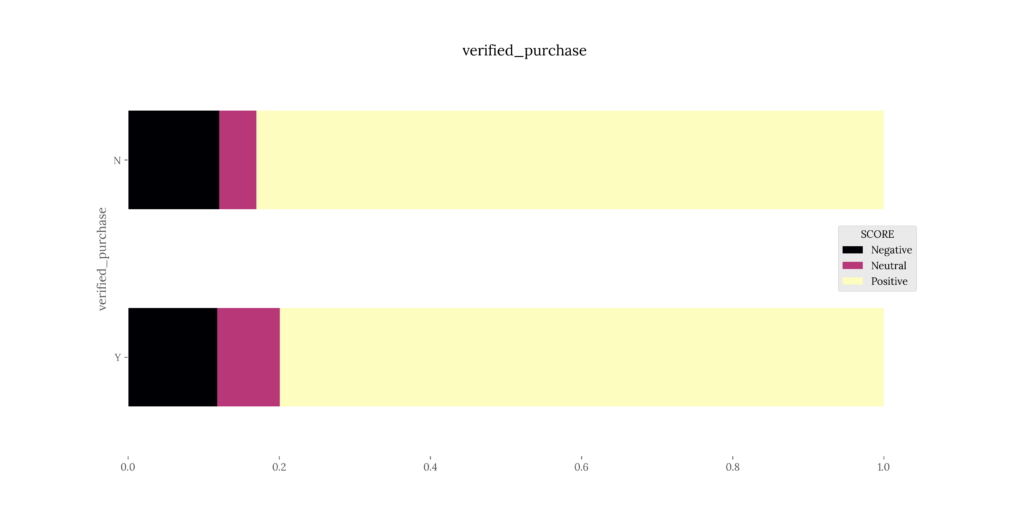
- 100% stacked bar chart for polarity percentages vs. user-defined aggregation columns per dataset.
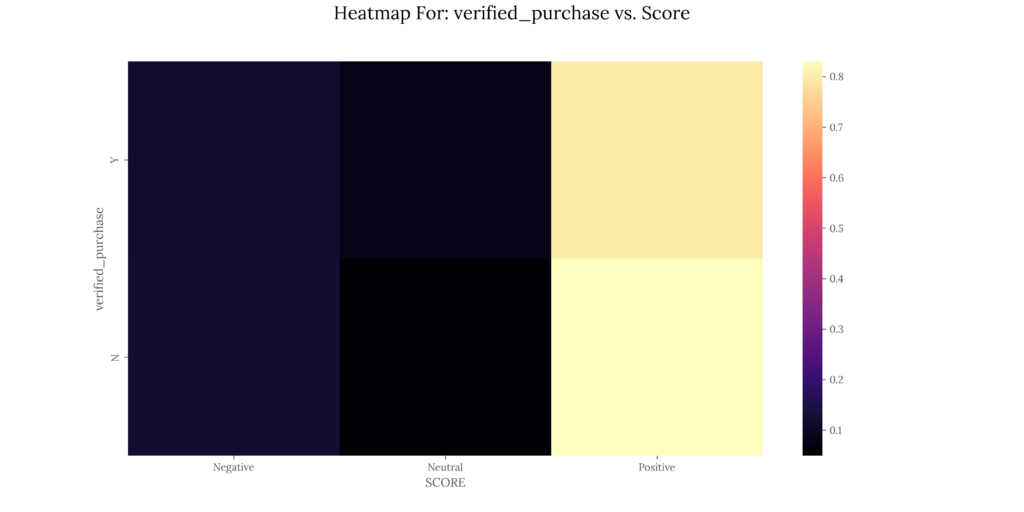
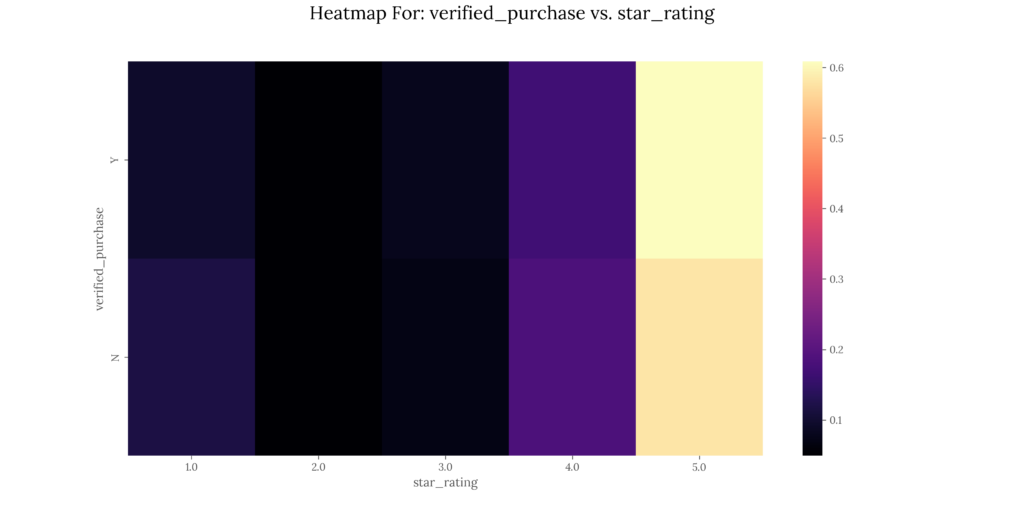
- Heatmap for polarity percentages vs. user-defined aggregation columns per dataset.
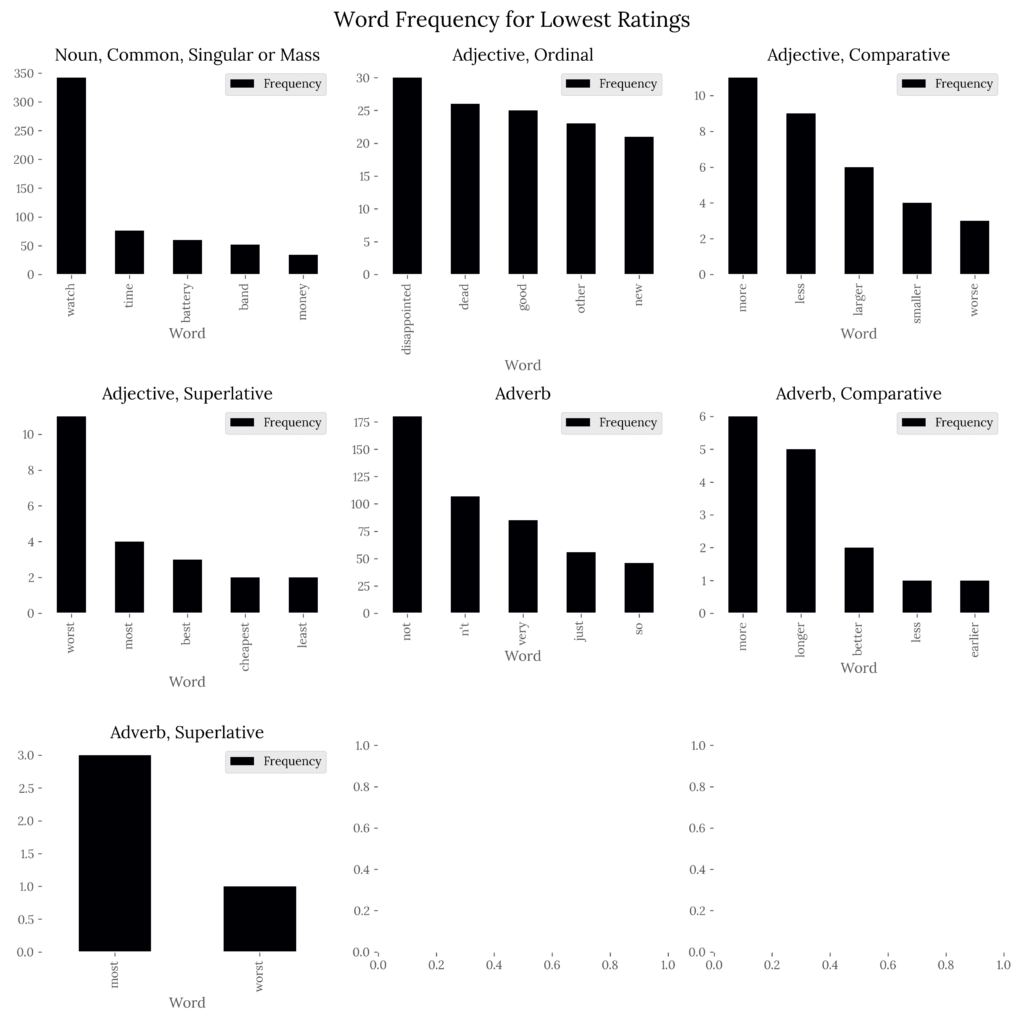
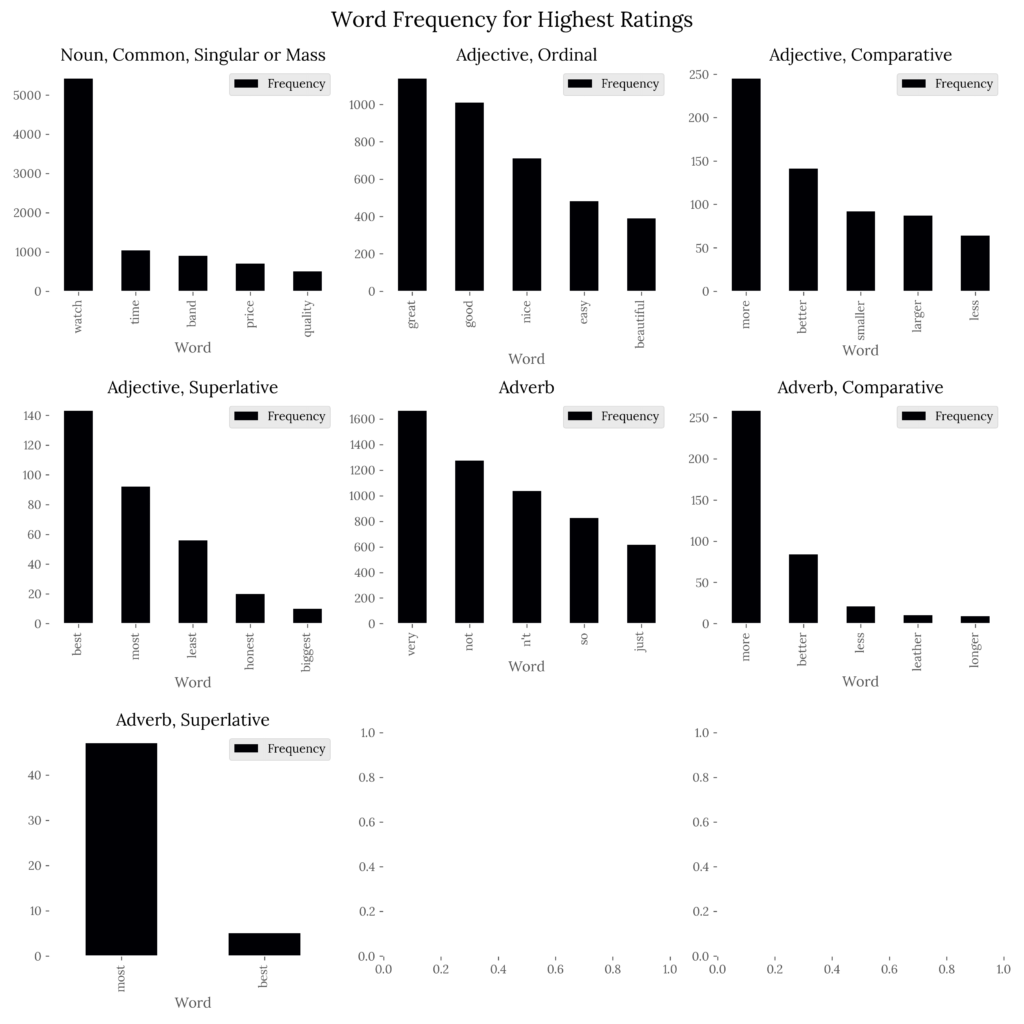
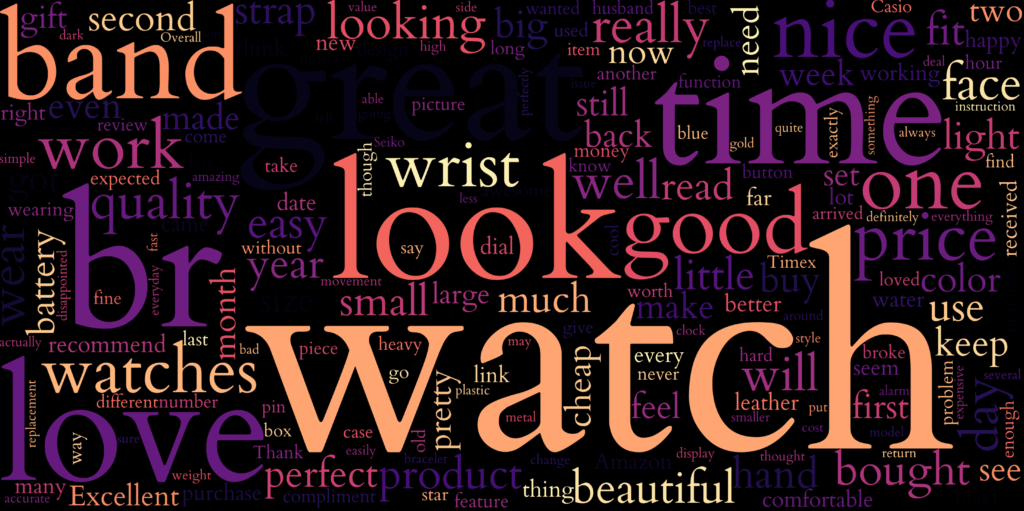
- Wordcloud representing most and least mentioned words on each review per dataset.
- Bar chart for word frequency analysis per POS for top
 scored reviews per dataset.
 - Bar chart for word frequency analysis per POS for lowest scored reviews per dataset.
4.3 Exporting
We would like to export the previous results in the following format:
| verified_purchase | MEAN | STD |
|---|---|---|
| Y | 0.5188 | 0.4162 |
| N | 0.2729 | 0.6172 |
| verified_purchase | MEAN | STD |
|---|---|---|
| Y | 4.2142 | 1.2278 |
| N | 3.5416 | 1.6145 |
| DATASET | TOTAL_ENTRIES | POSITIVE_PERC | NEUTRAL_PERC | NEGATIVE_PERC |
|---|---|---|---|---|
| amazon_reviews_us_Watches_v1_00.csv | 276 | 0.8188 | 0.0761 | 0.1051 |
| DATASET | TOTAL_ENTRIES | MEDIAN | MEAN | STANDARD_DEVIATION | MIN_VALUE | FIRST_QUARTILE | SECOND_QUARTILE | THIRD_QUARTILE | MAX_VALUE | POSITIVE_PERCENTAGE | NEUTRAL_PERCENTAGE | NEGATIVE_PERCENTAGE | SPEARMAN_RANK_CORRELATION | SPEARMAN_RANK_P_VALUE | PEARSON_CORRELATION | PEARSON_P_VALUE |
|---|---|---|---|---|---|---|---|---|---|---|---|---|---|---|---|---|
| amazon_reviews_us_Watches_v1_00.csv | 276 | 0.6249 | 0.497491667 | 0.441394804 | -0.9762 | 0.2732 | 0.6249 | 0.85235 | 0.9907 | 0.8188 | 0.0761 | 0.1051 | 0.441383302 | 1.37712E-14 | 0.638498257 | 5.19369E-33 |
General project structure
When starting a project, the first step is to design a structure that makes sense for what we’re building. We can look at the structure as to how our folders, files, classes, and functions will be ordered and how they will interact. This is extremely important since we’ll be writing a lot of modular code, and things can get lost easily, particularly when we’re escalating our application to bulk operation.
1. Structure chart
There are multiple ways of approaching a project structure design; it depends on each personal taste, although good practices are in place to guide us through. Implementing a structure chart (SC) is the best way to start designing our process flow.
A structure chart is a diagram showing a system’s breakdown to its lowest manageable levels. It’s used in structured programming to arrange program modules into a tree-like system; each module is represented by a box containing the module’s name. The tree structure represents the relationships between modules.

As we can see from the SC above, we’ll implement a frontend, a backend, configuration files, and utility functions, so a main folder with subfolders as packages makes sense for our case.
2. Project components
Below is what we’ll need for this project:
- An input folder.
- An output folder.
- A virtual environment.
- A source code folder
src:- A main function that will execute the application.
- A frontend module containing all GUI components
- Two configuration files:
- A configuration file for variable options.
- A parameters file for modifying our GUI’s appearance.
- A configuration & parameter-getter module that will read the parameters from our configuration files.
- A string formatting module that will format the text outputs displayed in the GUI’s text log.
- A preprocessing module that will download/load and clean our data before feeding it into the model.
- A sentiment analysis file that will apply the NLP models to our data.
- A results analysis file that will analyze our sentiment results.
- A results writer that will write the analyses to Excel files or plots, depending on the user’s choice.
We will create a master folder (project folder) where the inputs, outputs, and source code will reside. This folder will have the following structure:
sentiment-analysis-with-python: The project folder.datasets: Where our datasets will be downloaded and read from.outputs: Where our analyses will be written in.se_env: Our virtual environment.src: Where the source code will be located.requirements.txt: Where all the dependencies will be specified.
The application will be divided into multiple packages denoted by folders. Each package will contain modules belonging to similar functionalities, characterized by files. Each file will serve a specific purpose and include one main class. Each class will contain one or more methods denoted by functions.
The package structure inside src will be as follows:
src: Where the source code will be located.main.py: Our main function which the user will execute (this will be the only point of contact for a typical user).application: Frontend packagesconfig: Where we will store configuration files and default parameters for our application.sentiment_analysis: Where all the packages related to the analysis will be located.models:Where the model definition for VADER will be located.
- utils: Where helper scripts will be located.
3. Class definition approach
When working with a modular, multi-class structure, we have some approaches available we can use to create relations within classes:
- Mixin classes
- Single/Multiple inheritance classes
- Composite classes
- Data Transfer Object classes
- Composite classes
In Python, a mixin class provides methods to other classes but is not considered a base class. In short, a mixin is a class that extends the functionality of other classes without requiring initialization using an __init__ function, calls to super() to initialize parent classes, and other aspects that a conventional class would require.
Below are some other advantages of a mixin approach over conventional classes:
- The main class inherits all mixin class methods directly from
nmixin classes. - Parameters & data are defined on the main function, so there’s no need to redefine attributes inside mixin classes.
selffrom the main class is automatically accessible inside mixin class methods.
Singe/multiple inheritances are the traditional approach to OOP and work hierarchically (vertically) by defining a parent class and a child class, where the latter inherits methods and attributes from the first. We can think of inheritance as a child class or subclass that is derived from another class or as a parent class whose behavior is extended by a child class.
Composition works horizontally by defining two classes that can interact with each other without the vertical structure (child-parent association) from the inheritance approach. We can think of composition as a class with a relationship with another class. A composition approach has a composite class, which can have a component class associated.
Data Transfer Objects (DOT) are data structures typically used to pass data between application layers or between services. They don’t possess methods of their own; instead, they simply transfer data. This approach is useful when, for example, we have three child classes where:
- We want to avoid creating an inheritance structure between them.
- We would like to set attributes, but we don’t have access to a parent class (it can be part of a third-party framework we’re using and is not accessible without involving modifications to the framework class’s source code, which is far from ideal).
In this project, we’ll use the following:
- Mixin classes to extend the behavior of other classes.
- Single/Multiple inheritances to interact with our GUI’s package,
customtkinter. - Data Transfer Object classes to set common variables for three classes in our
_app.pymodule.
Preparing the environment
We will start by creating our main folder along with the required subfolders:
Code
mkdir sentiment-analysis-with-python/srccd sentiment-analysis-with-pythonmkdir datasets, outputscd srcmkdir application, config, sentiment_analysis, utils1. Creating a virtual environment
We will create a virtual environment tailored to this project. We’ll be using Python 3.9.0, which we will need to download if we haven’t already.
We will then create our environment using the installed Python version. This environment will be located inside our project folder, sentiment-analysis-with-python:
Code
C:\Users\username\AppData\Local\Programs\Python\Python39\python.exe -m venv 'se_env'2. Installing required libraries
Since we’ll be using a fair amount of libraries, it’s easier for us and for the final user to define a requirements.txt file, the reason being we can quickly install all dependencies with a single pip command.
The requirements.txt file will be located inside our project folder, sentiment-analysis-with-python, and will contain the following packages:
customtkinter
xlsxwriter
matplotlib
nltk
numpy
pandas
polars
pyarrow
pyinstaller
scikit-learn
seaborn
spyder-kernels
textblob
tk
tomli
wordcloud
We can then activate our virtual environment from within the main project folder on the current terminal session and install all the dependencies. We must remember that Activate.ps1 is meant for PowerShell; other shells have their own activate script.
Code
se_env/Scripts/Activate.ps1pip install -r requirements.txtImplementing the main components
Once we have a good understanding of the project’s general structure and packages, we can implement the main modules, classes, and functions; this way, we have clarity of what goes where.
There are multiple ways of approaching this step:
- Implementing classes and functions using placeholders: Each class and function is followed by a temporary
passstatement upon initial writing. When we need to write the class or function, we simply remove the temporary statement and write our code. This approach works better when we add docstrings for each definition; it helps us remember and clarify what the definition is for. - Implementing boilerplate code: Boilerplate code is code repeated in multiple places with little to no variation; if we declare a child class that inherits from a parent class, we would declare the class itself, including an
__init__(self)method, and a call the parent class by including asuper().__init__(self)method. - Implementing pseudocode: An artificial and informal language usually comprised of simpler code and comments. It helps clarify what we intend to do with our classes and functions but is not necessarily executable to the full extent.
- Implementing skeletons: Similar to pseudocode, skeleton programming consists of a simpler version of our intended code, though it differs in that it can be compiled without errors.
For this example, we’ll combine the first two approaches and reason the code as we move forward.
1. Modules
Each package will have multiple files inside, each one representing a module. For each module, we will follow the snake case format with single leading underscore practice _module.py, where each file representing a module will be signaled as an internal module; a single leading underscore in front of a variable, a function, or a method name means that these objects are used internally. This also means that when importing modules using a wildcard *, these will not be imported.
We will start by creating our modules inside each src package and defining boilerplate code inside them. Our definitions will not make much sense now, but will serve as our project’s skeleton and will be explained later on:
1.1 Application
application
│   _app.py
Main structure for _app.py:
Code
# Third-party packages
import customtkinter
import matplotlib
import matplotlib.pyplot as plt
import tkinter

# Built-in packages
import os
import shutil
import time
import warnings
warnings.filterwarnings("ignore")

# Internal packages
import utils
import sentiment_analysis

# Define classes and functions
class SetGlobalParams(utils.GetParameters):
    '''
    DOT (Data Transfer Object) Class:
    - Set global parameters for all ctinker objects.
    '''
    def __init__(self, *args, **kwargs):
        super().__init__(*args, **kwargs)

class HelpPrompt(SetGlobalParams,
                 customtkinter.CTkToplevel):
    '''
    HelpPrompt class:
        - Display Help prompt when required.
    '''
    def __init__(self, *args, **kwargs):
        super().__init__(*args, **kwargs)

class AboutPrompt(SetGlobalParams,
                  customtkinter.CTkToplevel):
    '''
    AboutPrompt class:
        - Display About prompt when required.
    '''
    def __init__(self, *args, **kwargs):
        super().__init__(*args, **kwargs)

class MainApplication(SetGlobalParams,
                      customtkinter.CTk,
                      sentiment_analysis.SentimentAnalysis):
    '''
    MainApplication class:
        - Main GUI for SentimentAnalysis Application
    '''
    def __init__(self, *args, **kwargs):
        super().__init__(*args, **kwargs)

    def openHelpPrompt(self):
        '''
        Event: Open Help prompt.
        '''
        pass

    def openAboutPrompt(self):
        '''
        Event: Open About prompt.
        '''
        pass

    def returnThresholdVal(self, value):
        '''
        Event: Get threshold values and print to text log.
        '''
        pass

    def runModel(self):
        '''
        Event: Performs initial input exception handling.
        Event: Runs model using SentimentAnalysis inherited module.
        '''
        pass

if __name__ == '__main__':
MainApplication()1.2 Sentiment analysis
sentiment_analysis
│   _results_analysis.py
│   _results_writer.py
│   _sentiment_analysis.py
│
├───models
│   │   vader.py
Main structure for _sentiment_analysis.py:
Code
# Third-party packages
import numpy as np
import pandas as pd
import polars as pl
import pyarrow
from textblob import TextBlob

# Built-in packages
import os
import time
import warnings
warnings.filterwarnings('ignore')

# Internal packages
from utils import PreprocessData
from sentiment_analysis.models import vader
from sentiment_analysis.models import happy_transformer
from ._results_analysis import ResultsAnalysis
from ._results_writer import ResultsWriter

# Define SentimentAnalysis class
class SentimentAnalysis(PreprocessData,
                        ResultsAnalysis,
                        ResultsWriter):
    '''
    Perform sentiment analysis on a given data set.
    '''

    def applyModel(self, df, dataset):
        '''
        Apply sentiment analysis model depending on the user's choice.
        '''
        pass

    def executeModel(self):
        '''
        Downloads datasets if the user has requested Download operations.
        Loads data sets one by one and perform analysis per dataset.
        '''
        pass

if __name__ == '__main__':
SentimentAnalysis()Main structure for _results_analysis.py:
Code
# Third-party packages
import matplotlib
import matplotlib.pyplot as plt
import nltk
nltk.download('punkt')
nltk.download('averaged_perceptron_tagger')
import numpy as np
import pandas as pd
import polars as pl
from scipy.stats import spearmanr
from scipy.stats import pearsonr
import seaborn as sns
from sklearn.preprocessing import MinMaxScaler
from wordcloud import WordCloud, STOPWORDS, ImageColorGenerator

# Built-in packages
import os
import shutil
import warnings
warnings.filterwarnings('ignore')

class ResultsAnalysis:
    '''
    Collect iteration information.
    Perform analyses to pass to writing.
    '''
    def setScoresComp(self, score):
        '''
        Sets sentiment tag based on compound score.
        '''
        pass

    def getPercentages(self, df_processed):
        '''
        Calculates percentages for Positive, Neutral, and Negative
        based on the score.
        '''
        pass

    def calculateCorrelation(self, df_processed):
        '''
        Calculates the correlation between
        the compound score and the actual rating.
            - Spearman Rank Coefficient
            - Pearson Coefficient
        Calculates the p-value associated
        with this correlation.
            - Spearman Rank Coefficient P-Value
            - Pearson Coefficient P-Value
        Provides the user with two measures
        with which to trust/not trust the model results.
        '''
        pass

    def findTags(self, tag_prefix, tagged_text):
        '''
        Get the most frequent words
        per selected nltk tag using
        the var_top_words param.
        '''
        pass

    def performGrammaticalAnalysis(self,
                                   df_subset,
                                   nltk_tags,
                                   banned_chars,
                                   grammatical_tags):
        '''
        Perform word frequency analysis per POS.
        '''
        pass

    def getGrammaticalDetail(self, df_processed):
        '''
        Get the grammatical frequency
        of top and bottom-performing subsets
        '''
        pass

    def plotGrammaticalDetail(self,
                              tag_frequency,
                              grammatical,
                              axis,
                              counter):
        '''
        Generate a new figure.
        Plot the word frequency.
        Return a figure containing the plot.
        '''
        pass

    def plotWordCloud(self, df_processed):
        '''
        Generate wordcloud figure
        on most repeated words per dataset.
        '''
        pass

    def plotAggCols(self, agg_col, df_agg):
        '''
        For each agg column,
        plot a rating per agg level 100%
        stacked bar chart.
        '''
        pass

    def plotHeatMap(self,
                    agg_col,
                    df_agg,
                    agg_target):
        '''
        For each agg column,
        plot a rating per agg level 100%
        heatmap.
        '''
        pass

    def generateTechnicalCalc(self,
                              df_processed,
                              dataset,
                              score_percentages):
        '''
        For each iteration, calculates the following:
            - Total entries
            - CMP Median
            - CMP Mean
            - CMP STD
            - CMP MIN
            - CMP Q1
            - CMP Q2
            - CMP Q3
            - CMP MAX
            - SCORE Positive Perc
            - SCORE Neutral Perc
            - SCORE Negative Perc
            - Spearman Rank Corr Coef
            - Spearman Rank Corr P-Value
            - Pearson Corr Coef
            - Pearson Corr P-Value
        '''
        pass

    def generateBusinessCalc(self,
                             df_processed,
                             dataset,
                             score_percentages):
        '''
        For each iteration, calculates the following:
            - Total entries
            - SCORE Positive Perc
            - SCORE Neutral Perc
            - SCORE Negative Perc
        '''
        pass

    def generateStats(self, df_processed, agg_col_list):
        '''
        Calculate Mean and Standard Deviation
        of Compound and Rating for all
        aggregation Levels.
        '''
        pass

    def generateTechnicalPlots(self,
                               tag_frequency_top,
                               tag_frequency_bottom):
        '''
        For each iteration, generate technical plots.
        '''
        pass

    def generateBusinessPlots(self,
                              df_processed,
                              agg_col_list):
        '''
        For each iteration, generate business plots.
        '''
        pass

    def performAnalysis(self, df_main, dataset):
        '''
        Perform analysis depending on user input:
        - Technical
        - Business
        - Visual
        - Complete
        '''
        pass

if __name__ == '__main__':
ResultsAnalysis()Main structure for _results_writer.py:
Code
# Third-party packages
import matplotlib
import matplotlib.pyplot as plt
import nltk
import numpy as np
import pandas as pd
import polars as pl
import pyarrow
import seaborn as sns
import xlsxwriter

# Built-in packages
import os
import warnings
warnings.filterwarnings('ignore')

class ResultsWriter:
    '''
    Mixin class:
        - Decide which analysis to write for a given iteration.
        - Get analysis for each iteration.
        - Output files depending on the selected analysis.
    '''
    def createDirs(self, result_dict):
        '''
        Create directories for all datasets,
        where we will store all iteration-wise results.
        '''
        pass

    def getAttributesParams(self):
        '''
        Extract attributes (Will be the same for all datasets)
        '''
        pass

    def plotTechnical(self, result_dict, res_index):
        '''
        Write the previously generated technical plots.
        '''
        pass

    def plotBusiness(self, result_dict, res_index):
        '''
        Write the previously generated business plots.
        '''
        pass

    def writeStats(self, result_dict, res_index):
        '''
        Write stats applicable for Technical, Business, and Complete.
        '''
        pass

    def writeTechnical(self, result_dict, res_index):
        '''
        - Write an excel file with tabs:
            - PARAMETERS:
                - model
                - target_id_col,
                - agg_cols,
                - rating_col,
                - target_col.
            - RESULTS:
                - Total entries
                - CMP Median
                - CMP Mean
                - CMP STD
                - CMP MIN
                - CMP Q1
                - CMP Q2
                - CMP Q3
                - CMP MAX
                - SCORE Positive Perc
                - SCORE Neutral Perc
                - SCORE Negative Perc
                - Spearman Rank Corr Coef
                - Spearman Rank Corr P-Value
                - Pearson Corr Coef
                - Pearson Corr P-Value
        '''
        pass

    def writeBusiness(self, result_dict, res_index):
        '''
        - Write an excel file with tabs:
            - PARAMETERS:
                - model
                - target_id_col,
                - agg_cols,
                - rating_col,
                - target_col.
            - RESULTS:
                - Total entries
                - SCORE Positive Perc
                - SCORE Neutral Perc
                - SCORE Negative Perc
        '''
        pass

    def writeResults(self, result_dict):
        '''
        Create a pack of analyses based on user input.
        '''
        pass

if __name__ == '__main__':
ResultsWriter()Main structure for models/vader.py:
Code
# Third-party packages
import nltk
from nltk.sentiment import SentimentIntensityAnalyzer

def vaderModel():
    '''
    Download the VADER lexicon first.
    Define Sentiment Analyzer object.
    Return model object.
    '''
    pass

if __name__ == '__main__':
vaderModel()1.3 Utils
utils
│   _get_parameters.py
│   _preprocess_data.py
│   _string_formatting.py
Main structure for _get_parameters.py:
Code
# Third-party packages
import tomli

# Main class
class GetParameters:
    '''
    Mixin class:
        - Get parameters
        - Get configuration
    '''

    def getParams(self):
        '''
        Get parameters from .toml file
        '''
        pass

    def getConfig(self):
        '''
        Get configuration from .toml file
        '''
        pass

if __name__ == '__main__':
GetParameters()Main structure for _string_formatting.py:
Code
class StringFormatting:
    '''
    Mixin class:
        - Pad string
        - Insert log into application textlog
    '''

    def padStr(self, measure_title, value_title):
        '''
        Format a string to be inserted into the log.
        '''
        pass

    def insertLog(self, *args, clear=False):
        '''
        Insert a log into textlog.
        Perform all required activities associated:
            - Enable text log.
            - If clear==True, clear the log before. Else, keep.
            - Insert all kwargs into the text log.
            - Disable text log.
            - Update idle tasks.
        '''
        pass

if __name__ == '__main__':
StringFormatting()Main structure for _preprocess_data.py:
Code
class PreprocessData(StringFormatting):
    '''
    - Download (if the user specifies) and read datasets into a
    Polars DataFrame object.
    - Cast required data types.
    - Select user-required columns.
    - Return a processed Polars DataFrame object.
    '''

    def downloadMode(self):
        '''
        Enter download mode, where all URLs are specified on source.txt.
        Will be downloaded in the datasets folder.
        '''
        pass

        def downloadData():
            '''
            Download the dataset if it does not yet exist.
            '''
            pass

    def readMode(self, dataset):
        '''
        Enter read mode, where a dataset will be read
        if it exists in the datasets directory.
        '''
        pass

        def selectCols():
            '''
            Get columns required by the user.
            '''
            pass

        def castTypes(df, cols_text, col_rating):
            '''
            Cast columns to appropriate data types for model execution.
            '''
            pass

        def readData(dataset):
            '''
            This function will read one file per iteration
            and return a dataframe.
            It will perform the following tasks:
                - Read a file if it exists and is of the correct file format.
                - Select user-defined columns if they exist.
                - Cast user-defined columns to correct data type.
                - Return a processed Polars DataFrame object.
            A data set can be in the form of:
                - A .csv file.
                - A .tsv file.
                - A compressed .gz file containing:
                    - A .csv file.
                    - A .tsv file.
            For column selection:
                - Agg columns (max 4, min 1). Can be str, int or float type.
                - ID column. Can be str or int type.
                - Target column. Requires str type.
                - Rating column. Can be int or float type.
            '''
            pass

if __name__ == '__main__':
PreprocessData()We may have noticed a few interesting characteristics from our modules:
We imported modules using a structured approach. It’s always best practice to import modules using the following rules:
- Third-party packages first
- Built-in packages second
- Internal packages third
- All imports should ideally be listed alphabetically in ascending order.
Mixin classes don’t have an __init__(self) method. This is because mixin classes are not meant to be initialized with arguments; instead, they are meant to use the arguments from the class inheriting the mixin class.
Mixin class methods have self as a parameter. This is because when we call a mixin class from another class, the mixin inherits the latter’s methods and attributes denoted by self. By including the self attribute in the mixin class functions, we specify that said function should inherit whichever methods and attributes are specified on the calling class.
We include # type: ignore at the end of specific lines. This statement tells our Python debugger to ignore errors on the current line we’re in. There are multiple reasons why we’re using this technique:
- By design, a mixin class does not explicitly inherit attributes from a “parent class”. We may notice that mixin classes are not declared as a conventional child class would be declared (i.e.
MyClass(ParentClass):)
We included if name == main in all modules. This snippet is key when working with internal module imports; when we create a module and import it from another script, the Python interpreter will automatically execute it upon import. We don’t want that. Instead, we would like our imports executed upon explicitly calling them. By implementing if name == main on our modules, we ensure that they only run if explicitly executed from a shell, for example, or upon function calling inside another script.
Now that we have our modules defined, we can package them.
2. Packages
As mentioned, we will express our packages as folders inside src. For a folder to be used as a package, we must include a special file, __init__.py, inside each folder. This way, we can import entire packages across files without needing to import each module explicitly; when we import a folder as a package from another file, the Python interpreter calls __init__.py, which includes all imported modules as part of the package.
The basic structure of an __init__.py file is very simple; we import the modules we wish to include in the package, along with the classes we wish to use in other files:
Code
from ._app import SetGlobalParamsIn this case, _app would be our module (file), and SetGlobalParams would be a class inside the module we wish to use across our project files.
We prepend our module import with a dot . since the Python interpreter doesn’t know that even though we’re in the same directory as our modules. This is why we explicitly have to specify we would like to import the _app.py module, which is located inside the current directory (.).
We can create an __init__.py file per package and populate it with our module imports.
Imports for aplication/__init__.py:
Code
from ._app import SetGlobalParams, HelpPrompt, AboutPrompt, MainApplicationImports for sentiment_analysis/__init__.py:
Code
from ._results_writer import ResultsWriter
from ._results_analysis import ResultsAnalysis
from ._sentiment_analysis import SentimentAnalysisImports for utils/__init__.py:
Code
from ._get_parameters import GetParameters
from ._preprocess_data import PreprocessData
from ._string_formatting import StringFormattingNote that we’re not importing any external package here; we’re simply importing our own modules (files) along with the classes we defined earlier.
3. Configuration files
The last piece that needs to be added before we start writing our code is to define configuration files. Configuration files are extremely useful when writing code; we would like to provide a way to configure our application without messing up with the code itself. This technique offers a way for an external user, or even ourselves, to fine-tune any modifiable parameter which changes the behavior of our application’s interface or even backend. It also provides a way for us to define a set of variables that our application will use; we define our parameter and configuration options outside the code and write a getter function to manage the reading of the parameters from the created files.
The idea is to leave the configuration for the main user-defined parameters in the GUI and specific parameters such as the GUI’s font family, font size, text color, and other parameters inside a configuration file. This way, we purpose the GUI exclusively for model operation and leave the application’s configuration parameters saved in files, which the general user would not necessarily want to modify. In short, it keeps distractions away while keeping a backdoor for more fine-grained customization.
Also, a parameters file can be used as a collection of default values for the user-defined variables we will include later on. If the GUI were to malfunction, the user could still access the parameters file and set default values for all variables, effectively bypassing the GUI while making none to minor direct modifications to the code itself.

There are multiple file formats, such as .hcl, .json, and .yaml, tailored for configuration files. In this project, we will stick with the .toml (Tom’s Obvious Minimal Language) file format for both configuration and parameters files because of its multiple advantages:
- Is human-readable and supports complex configuration and settings.
- Supports comments.
- Has an easy-to-read and easy-to-parse structure.
- Has read and write capabilities.
- Has implementations in most programming languages.
- Maps unambiguously to a hash table.
- Supports eight native types such as key/value pairs, arrays, integers and floats, tables, and more.
- Supports sections.
3.1 Application configuration
The application configuration file will include parameters related to the appearance of the UI.
We can create our config.toml file inside our previously created src/config directory. We will then include the following:
Code
[interface]
color_theme = "blue"
front_color = "#f2f2f2"
background_color = "#1a1a1a"
geometry_width = 1416
geometry_height = 820
dot_sep = 25
radius = 0

[fonts]
text_color = "#f2f2f2"
text_placeholder_color = "#7f7f7f"
font_header_family = "Tw Cen MT"
font_header_size = 20
font_header_weight = "bold"
font_body_family = "Tw Cen MT"
font_body_size = 16
font_body_weight = "normal"
font_body_pc_family = "Tw Cen MT"
font_body_pc_size = 16
font_body_pc_weight = "normal"
font_body_pc_style = "italic"
font_code_family = "Fira Code Retina"
font_code_size = 13
font_code_weight = "normal"We’re dividing our content into two separate sections. This provides better organization when reading our file.
3.2 User parameters
The user parameters file will include default values for all user-defined parameters inside the GUI. We will use this file to set all options for our GUI menus.
We can create our parameters.toml file inside our previously created src/config directory. We will then include the following:
Code
[directories]
rdir =  "datasets"
wdir =  "outputs"
sourceurl = "source.txt"

[operation]
input_method = ["Download Mode", "Read Mode"]
model =  ["VADER", "TextBlob"]
analysis = ["Technical", "Business", "Visual", "Complete"]
chart_background = ['Transparent', 'Solid']
plot_color_scheme = ['rocket', 'rocket_r', 'mako', 'mako_r', 'flare', 'flare_r', 'crest', 'crest_r', 'magma', 'magma_r', 'viridis', 'viridis_r']
wait_time = ['0', '0.5', '1', '2', '3', '4', '5']
top_words = ['3', '4', '5', '6', '7']
nltk_threshold = [0.1, 0.2, 0.3, 0.4, 0.5, 0.6, 0.7, 0.8, 0.9]

[columns]
target_id_col = "review_id"
agg_cols = ["product_id", "verified_purchase", "helpful_votes", "vine"]
rating_col = "star_rating"
target_col = "review_body"3.3 Getter functions
Now that we have our parameter list, we will build two getter functions inside our _get_parameters.py file; one for each case (configuration and parameters). These functions should go inside our GetParameters mixin class:
Code
def getConfig(self):
	'''
	Get configuration from .toml file
	'''
	with open("config/config.toml", mode="rb") as f_conf:
		config = tomli.load(f_conf)

return configCode
def getParams(self):
	'''
	Get parameters from .toml file
	'''
	with open("config/parameters.toml", mode="rb") as f_params:
		params = tomli.load(f_params)

return paramsWhen we initialize our application, these methods will be called, returning a dictionary of the parameters we defined.
Now, we have everything ready to start writing the frontend of our application.
Frontend
There are three main frameworks we can use to write GUIs in Python:
PyQT5: A Python binding of the cross-platform GUI toolkit Qt.tkinter: The original built-intkinterlibrary with all the legacy widgets but with an outdated UI.customtkinter: A newer UI library based ontkintermaintained by TomSchimansky.
For this example, we’ll be using the third option, although there are some methods of tkinter we’ll also include.
customtkinter provides methods to define primary and secondary application windows, include grids, and define sections. We can include one or more widget-style instances in each section, such as titles, labels, text inputs, option menus, radio buttons, progress bars, text prompts, and more. Widgets that accept user input will store it as a previously-defined variable.
Since we’ll include three main windows (help, about, main application), we’ll need to define three classes that will inherit from different customtkinter classes.
Every customtkinter main application has the following generalized structure:
Code
import customtkinter

# Appearance settings
customtkinter.set_appearance_mode("dark")  # Modes: "System" (standard), "Dark", "Light"
customtkinter.set_default_color_theme("blue")  # Themes: "blue" (standard), "green", "dark-blue"

# Application instance for the main window
app = customtkinter.CTk()

# Window geometry
app.geometry("400x780")

# Application title
app.title("CustomTkinter simple_example.py")

# Frame
frame_1 = customtkinter.CTkFrame(master=app)
frame_1.pack(pady=20, padx=60, fill="both", expand=True)

# Widget
label_1 = customtkinter.CTkLabel(master=frame_1, justify=customtkinter.LEFT)
label_1.pack(pady=10, padx=10)

# Loop calling (keeps the window open until explicit closure)
app.mainloop()Conversely, we can also use a different class, customtkinter.CTkToplevel, instead of customtkinter.CTk to define secondary windows or prompts inside our main GUI.
This is as simple as a GUI can get, and from there, we can build n number of frames and widgets. Since we’ll build our application using a class approach, we’ll do things differently.
1. Global parameters
We’ll first define a class that will set global parameters for the 3 GUI classes we’ll be writing. We’ll head to our _app.py module, and include the following:
Code
class SetGlobalParams(utils.GetParameters):
    '''
    DOT (Data Transfer Object) Class:
    - Set global parameters for all ctinker objects.
    '''
    def __init__(self, *args, **kwargs):
        super().__init__(*args, **kwargs)

        # Set project path
        self.project_path = os.path.dirname(os.getcwd())

        # Get global config
        self.config_interface = self.getConfig()['interface']
        self.config_fonts = self.getConfig()['fonts']

        # Config interface
        self.color_theme = self.config_interface['color_theme']
        self.front_color = self.config_interface['front_color']
        self.background_color = self.config_interface['background_color']
        self.geometry_width = self.config_interface['geometry_width']
        self.geometry_height = self.config_interface['geometry_height']
        self.dot_sep = self.config_interface['dot_sep']
        self.radius = self.config_interface['radius']

        # Config fonts
        self.text_color = self.config_fonts['text_color']
        self.text_placeholder_color = self.config_fonts['text_placeholder_color']
        self.font_header_family = self.config_fonts['font_header_family']
        self.font_header_size = self.config_fonts['font_header_size']
        self.font_header_weight = self.config_fonts['font_header_weight']
        self.font_body_family = self.config_fonts['font_body_family']
        self.font_body_size = self.config_fonts['font_body_size']
        self.font_body_weight = self.config_fonts['font_body_weight']
        self.font_body_pc_family = self.config_fonts['font_body_pc_family']
        self.font_body_pc_size = self.config_fonts['font_body_pc_size']
        self.font_body_pc_weight = self.config_fonts['font_body_pc_weight']
        self.font_body_pc_style = self.config_fonts['font_body_pc_style']
        self.font_code_family = self.config_fonts['font_code_family']
        self.font_code_size = self.config_fonts['font_code_size']
        self.font_code_weight = self.config_fonts['font_code_weight']

        # Set global parameters
        customtkinter.set_appearance_mode("System")
        customtkinter.set_default_color_theme(self.color_theme)

        # Set font parameters
        self.font_header = customtkinter.CTkFont(family=self.font_header_family,
                                                 size=self.font_header_size,
                                                 weight=self.font_header_weight)

        self.font_body = customtkinter.CTkFont(family=self.font_body_family,
                                               size=self.font_body_size,
                                               weight=self.font_body_weight)

        self.font_body_pc = customtkinter.CTkFont(family=self.font_body_pc_family,
                                                  size=self.font_body_pc_size,
                                                  weight=self.font_body_pc_weight,
                                                  slant=self.font_body_pc_style)

        self.font_code = customtkinter.CTkFont(family=self.font_code_family,
                                               size=self.font_code_size,
                                               weight=self.font_code_weight
                                               )

        # Set global params for other classes
        self.threshold_top = 0.70
        self.threshold_bottom = -0.70

        # Define plot parameters
        # Remove cache in order to set font attributes successfully
        try:
            shutil.rmtree(matplotlib.get_cachedir())
        except FileNotFoundError:
            pass

        plt.style.use('ggplot')
        self.color_main = '#1a1a1a'
        self.text_padding = 18
        self.title_font_size = 17
        self.label_font_size = 14
self.subptitle_y = 0.98Here, we have extracted our configuration parameters defined in the parameters.toml file and some other parameters, such as plot formatting, and set them as class attributes. This way, we will have access to those when we inherit SetGlobalParams from any other class.
2. Help & About prompts
We can now define our popup windows, HelpPrompt and AboutPrompt. These objects will be straightforward and simply contain a frame and a text box widget. The text box widgets will get their text from the following files:
src/application/dialogues/about.txt- Project Information
- Contact Information
src/application/dialogues/help.txt- Select Model
- Select Analysis Type
- Select Chart Background
- Select Plot Color Scheme
- Select NLTK Analysis Top N Words
- Select NLTK Analysis Threshold
- Select Operation Mode
- Select Operation Time
- Select Columns
- Select Input Path
- Select Output Path
Code
class HelpPrompt(SetGlobalParams,
                 customtkinter.CTkToplevel):
    '''
    HelpPrompt class:
        - Display Help prompt when required.
    '''
    def __init__(self, *args, **kwargs):
        super().__init__(*args, **kwargs)

        # UI Elements - General Parameters
        # --------------------------------------------------
        self.geometry("600x300")
        self.title("Sentiment Analysis 1.0 | Help")
        self.minsize(600, 300)

        # create 2x2 grid system
        self.grid_rowconfigure(0, weight=1)
        self.grid_columnconfigure((0), weight=1)

        self.help_prompt = customtkinter.CTkTextbox(master=self,
                                                    corner_radius=self.radius,
                                                    font=self.font_body
                                                    )

        self.help_prompt.grid(row=0, column=0, padx=20, pady=(20, 20), sticky="nsew")

        with open(os.path.join(self.project_path, 'src', 'application', 'dialogues', 'help.txt'), 'r') as f:
            self.help_prompt.insert("0.0", text=f.read())

        self.help_prompt.configure(state='disabled')

        # Focus window
self.focus()Code
class AboutPrompt(SetGlobalParams,
                  customtkinter.CTkToplevel):
    '''
    AboutPrompt class:
        - Display About prompt when required.
    '''
    def __init__(self, *args, **kwargs):
        super().__init__(*args, **kwargs)

        # UI Elements - General Parameters
        # --------------------------------------------------
        self.geometry("600x300")
        self.title("Sentiment Analysis 1.0 | About")
        self.minsize(600, 300)

        # create 2x2 grid system
        self.grid_rowconfigure(0, weight=1)
        self.grid_columnconfigure((0), weight=1)

        self.about_info = customtkinter.CTkTextbox(master=self,
                                                   corner_radius=self.radius,
                                                   font=self.font_body)

        self.about_info.grid(row=0, column=0, padx=20, pady=(20, 20), sticky="nsew")
        with open(os.path.join(self.project_path, 'src', 'application', 'dialogues', 'about.txt'), 'r') as f:
            self.about_info.insert("0.0", text = f.read())

        self.about_info.configure(state='disabled')

        # Focus window
self.focus()As mentioned earlier, these windows inherit from the customtkinter.CTkToplevel class instead of the customtkinter.CTk class.
3. Main window
We can now define our main window with the following widgets:
CTkLabel: A text label used for titles.CTkButton: An actionable button.CTkOptionMenu: A menu containing multiple items to select from.CTkTabview: A tab menu.CTkSlider: A slider that can be horizontal or vertical.CTkEntry: A text entry.CTkTextbox: A text box that can be used for writing or read-only.CTkProgressBar: A bar that fills up upon some event.
3.1 Variable setting
We’d first like to define the variables we will use for each widget. tkinter provides variable objects for various types such as int, float, str, and datetime. These variables also have getter methods included, so if the user sets a variable using the GUI, we can retrieve that value without calling it directly.
The general syntax for a variable definition is the following:
Code
self.var_rdir = tkinter.StringVar(value=variable_name)Since we have a parameter file parameters.toml and a getter function getParams() already in place, we can simply assign variables using the following syntax:
Code
self.params_directories = self.getParams()['directories']
self.var_rdir = tkinter.StringVar(value=self.params_directories['rdir'])The first statement will get the directories section, while the second will extract the required value.
If we want to get the parameter’s value at any point in time, we can simply use the following syntax:
Code
self.var_wdir.get()If we have a parameter containing multiple options and would like to set a default value on one of our widgets, we can use the following syntax:
Code
self.config_operation = self.getParams()['operation']
self.var_model = tkinter.StringVar(value=self.config_operation['model'][0])3.2 Window geometry and structure
Once all our variables are defined, we’ll set our main window’s geometry, app title, and an optional favicon. For the dimensions, we’re inheriting the geometry_width and geometry_height attributes from our SetGlobalParams class:
Code
self.iconbitmap('digital_assets/favicon_code_white.ico')
self.geometry(f"{self.geometry_width}x{self.geometry_height}")
self.title('Author | Sentiment Analysis 1.0')Note that our icon must be in .ico file format. We can convert from .png using this link.
Once our main window is ready, we will continue defining our grid layout. From our GUI concept sketch, we have two primary columns: The first for the left sidebar and the second for everything else.
We can achieve this layout by specifying a grid of 2 columns and 1 row:
Code
self.grid_columnconfigure(1, weight=1)
self.grid_rowconfigure(0, weight=1)The weight=1 parameter tells customtkinter that the section will fill the window instead of keeping its size to fit the contents.
The next thing is to start defining our sidebar frame and main frame. The general syntax for a frame is as follows:
Code
self.sidebar_frame = customtkinter.CTkFrame(self, width=140, corner_radius=self.radius)
self.sidebar_frame.grid(row=0, column=0, rowspan=7, sticky="nsew")
self.sidebar_frame.grid_rowconfigure(7, weight=1)- The
.gridmethod denotes the global position for our frame. Coordinates(0, 0)would mean a location in the first row and first column of our window. - The
rowspanattribute extends our frame to whichever row coordinates we desire. If we specify a span of 7, the frame will extend the full height of our window, which is what we’re looking for in our sidebar. - Finally, we set 8 rows inside our frame containing each widget.
3.3 Sidebar widgets
Now that we have our grid, we can start populating with widgets:
Code
self.logo_label = customtkinter.CTkLabel(self.sidebar_frame,
                                         text="Sentiment Analysis 1.0",
                                         font=self.font_header)

self.logo_label.grid(row=0, column=0, padx=20, pady=(20, 10))We specify a CTkLabel widget by defining an instance of it and including the following attributes:
self.sidebar_frame: The parent frame.text: The text to display.font: The font to use.
We then locate our widget instance in a grid using the same coordinate principles as in the above example.
The Help & About buttons have an action associated with them; we would like the prompts to display to the user upon button click. Hence, we will associate a command with them:
Code
self.help_prompt = customtkinter.CTkButton(self.sidebar_frame,
                                           text="Help",
                                           font=self.font_body,
                                           command=self.openHelpPrompt,
                                           corner_radius=self.radius)

self.help_prompt.grid(row=1, column=0, padx=20, pady=10)A command or event is simply a function we declare that will get called upon interaction with our object. The Help button would be associated with the following event:
Code
def openHelpPrompt(self):
    '''
    Event: Open Help prompt.
    '''
    if self.toplevel_window is None or not self.toplevel_window.winfo_exists():
        self.toplevel_window = HelpPrompt(self)
    else:
self.toplevel_window.focus()Here, we’re creating an instance of the HelpPrompt class whenever we call the openHelpPrompt function. We can do the same for the About prompt.
We will now define the application appearance option menu:
Code
self.appearance_mode_optionemenu = customtkinter.CTkOptionMenu(self.sidebar_frame,
                                                               values=["System", "Light", "Dark"],
                                                               corner_radius=self.radius,
                                                               command=self.changeAppearanceMode,
                                                               font=self.font_body,
                                                               dropdown_font=self.font_body)

self.appearance_mode_optionemenu.grid(row=7, column=0, padx=20, pady=(10, 40))For an option menu, we need a set of possible values to display. We also need a command to execute when the user interacts with our widget.
The changeAppearanceMode event will look like such:
Code
def changeAppearanceMode(self, new_appearance_mode: str):
    '''
    Event: Change application appearance.
    '''
customtkinter.set_appearance_mode(new_appearance_mode)3.4 Main widgets
Once we have our sidebar, we will include the following:
- Tab frame:
- Model selection: Switch between models.
- Analysis: The type of analysis to export, the chart background, and the plot color scheme.
- Advanced options: The top n words and score threshold to export in the grammatical analysis we will review further on.
- Operation parameters:
- Operation mode: Read or download.
- Operation time: Time in seconds between each text log insertion.
- Text log
- Column selection:
- Up to 4 aggregating columns.
- One target column.
- One index column.
- One rating column.
- Path selection
- Datasets or URL file
- Outputs for analysis export.
- Progress bars
- Download/Load
- Model execution
- Analysis
3.4.1 Option menus
We can define an option menu where values are extracted from our parameters.txt file by using the following syntax:
Code
self.model_name = customtkinter.CTkOptionMenu(self.parameters.tab("Model"),
                                              dynamic_resizing=False,
                                              values=self.getParams()['operation']['model'],
                                              corner_radius=self.radius,
                                              font=self.font_body,
                                              dropdown_font=self.font_body,
                                              width=self.option_box_width,
                                              variable=self.var_model
                                              )

self.model_name.grid(row=1, column=0, padx=20, pady=(10, 10))- The
valuesparameter will be set to our getter function for the parameter we’re looking for. - The
variableparameter will be set to the previously set variable. This will change whenever the user changes the option.
3.4.2 Horizontal slider
We can define a horizontal slider for our threshold values by using the following syntax:
Code
self.nltk_threshold = customtkinter.CTkSlider(master=self.parameters.tab("Advanced"),
                                              from_=0,
                                              to=1,
                                              variable = self.var_nltk_threshold,
                                              command=self.returnThresholdVal
                                              )

self.nltk_threshold.grid(row=3, column=0, padx=(20, 10), pady=(10, 10), sticky="ew")- Since we want our values to range from 0 to 1, we set the two attributes,
from_andto, to reflect our desired range. - We also set a
variableand acommandto execute.
Since we want our slider variable to change but also to return the current values to the user, we will define the following function:
Code
def returnThresholdVal(self, value):
    '''
    Event: Get threshold values and print to text log.
    '''
    self.threshold_value_bottom_curr = self.padStr('THRESHOLD TOP', f'+{round(value, 4)}')
    self.threshold_value_top_curr = self.padStr('THRESHOLD BOTTOM', round(-value, 4))
    self.insertLog(f"{self.threshold_value_top_curr}\n",
                   f"{self.threshold_value_bottom_curr}\n",
clear=True)We can notice two new methods:
padStrinsertLog
The first method generates a justified string output filled with dot . characters so that our information is presented to the user in the following format:
Code
PARAMETER........VALUE
PARAMETER_2......VALUE2
The second method comes from our _string_formatting.py module and inserts an entry into the text log we will soon define.
3.4.3 Text log
A text log is a helpful tool that we can use to present valuable information to the user. The idea is to print status updates to the user upon key progress part completions.
A text log can be defined using the following syntax:
Code
self.textlog = customtkinter.CTkTextbox(self.textbox_frame,
                                        width=450,
                                        wrap='word',
                                        font=self.font_code
                                        )

self.textlog.grid(row=0, column=0, padx=(20, 20), pady=(20, 20), sticky="nsew")To insert an entry into our text box instance, we can use the following syntax:
Code
self.textlog.configure(state="normal")
self.textlog.delete("0.0", "end")
self.textlog.insert("0.0", 'Text')
self.textlog.configure(state="disabled")
self.update_idletasks()- The
statedictates if the prompt is read-only or can be written into. Since we don’t want the user to be able to write in our log window, we need to disable it after each insertion and enable it again before we insert our text. - The
deletemethod clears the window, ensuring a clean prompt before insertion. The two parameters included denote the following:- From character
0, line0. - Up to the end.
- From character
- The
insertmethod inserts a line of text at position character0line0, with the messageText, which can, of course, be assigned to a variable. - The
update_idletasksupdates pending tasks when called. Without this statement, we would see the insertion reflected only after our execution concludes.
We will use an alternative structure that will include a string pre-formatting function. This will be useful when printing a variable name and its value to the screen, increasing the output legibility.
We will create two separate functions for these two actions by defining a string_formatting.py library inside our resources folder. We will include both functions as part of our previously defined StringFormatting mixin class:
Code
def padStr(self, measure_title, value_title):
    '''
    Format a string to be inserted into log.
    '''
    measure_title += ' '
    self.padded_str = measure_title + '.'*(self.dot_sep - len(measure_title)) # type: ignore
    self.padded_str = ('%s %s' % ( self.padded_str, value_title))

return self.padded_strCode
def insertLog(self, *args, clear=False):
    '''
    Insert a log into textlog.
    Perform all required activities associated:
        - Enable text log.
        - If clear==True, clear the log before. Else, keep.
        - Insert all kwargs into text log.
        - Disable text log.
        - Update idle tasks.
    '''
    if clear==True:
        self.textlog.configure(state="normal") # type: ignore
        self.textlog.delete("0.0", "end") # type: ignore
        for textlog in args:
            self.textlog.insert(self.print_position, textlog) # type: ignore
        self.textlog.configure(state="disabled") # type: ignore
        self.update_idletasks() # type: ignore

    elif clear==False:
        self.textlog.configure(state="normal") # type: ignore
        for textlog in args:
            self.textlog.insert(self.print_position, textlog) # type: ignore
        self.textlog.configure(state="disabled") # type: ignore
        self.update_idletasks() # type: ignore

return NoneWe included an additional parameter, clear, where we will be able to define if we want to clear the log before text insertion or keep previous messages. Keeping logs for certain messages is important since the user might want to scroll over the entire log to check the specific output messages for a given step.
3.4.4 Text entries
A text entry can be defined using the CTkEntry method. Whenever the user inputs a value, it gets registered as a variable of our choice, which we can use at any time during the execution.
The basic syntax is as follows:
Code
self.col_entry_1 = customtkinter.CTkEntry(self.column_entry,
                                          placeholder_text="Column 1",
                                          corner_radius=self.radius,
                                          font=self.font_body_pc,
                                          placeholder_text_color=self.text_placeholder_color,
                                          textvariable=self.var_col1
                                          )

self.col_entry_1.grid(row=1, column=0, padx=(10, 10), pady=(10, 10), sticky="new")- The
placeholder_textattribute sets a temporary indicator inside the text entry. - The
textvariabledenotes the variable we’ll assign to the input text entry.
3.4.5 Progress bars
A progress bar is a graphical control element used to visualize the progression of an extended computer operation. We want to provide the user a way to visualize the overall progress of the execution, divided into three main steps:
- Download/Load
- Model execution
- Results analysis
A progress bar can be defined using the following syntax:
Code
self.progressbar_1 = customtkinter.CTkProgressBar(self.progress_frame,
                                                  mode='determinate',
                                                  height=self.progress_bar_height,
                                                  corner_radius=self.radius)

self.progressbar_1.grid(row=1, column=0, padx=(20, 20), pady=(10, 10), sticky="new")
self.progressbar_1.set(0) # Set to 0, since by default, it will be set to 0.5- The
mode=determinateattribute denotes that we know the length of our process in terms of a numerical value. We will calculate this further on. - The
heightwill denote the actual bar height in our GUI. - The initial value will always be 0, which we can define using the
progressbar_1.set(0)method.
A progress bar update event can be defined as such:
Imagine we have a DataFrame object of len=30,000 and wish to iterate over all elements. Since we know the length of our object, we can define a step size scaled to a range [0, 1] by performing the following operation:
Code
total_items = len(df)
progress_2_step = 1/total_itemsWe would increase the step by a step-size unit upon each iteration. We could keep count of our total progress by adding our step size on each iteration and then setting our progress bar to this value:
Code
progress_2_perc = 0
self.progressbar_2.start()

for col_id, target in target_data.iterrows():
	progress_2_perc += progress_2_step
	self.progressbar_2.set(progress_2_perc)
	self.update_idletasks()

self.progressbar_2.stop()This way, when our iteration concludes, our sum has reached the total number of iterations scaled to a range of [0, 1], and the progress bar will reflect completion.
3.4.6 Execution button
We wish to provide the user with a way to run the sentiment analysis whenever all options are correctly selected. We can define a button using the following syntax:
Code
self.main_button_1 = customtkinter.CTkButton(master=self.path_entry,
                                             text='Run Model',
                                             fg_color="transparent",
                                             border_width=1,
                                             font=self.font_body,
                                             text_color=("gray10", self.text_color),
                                             corner_radius=self.radius,
command=self.runModel)- As with previous examples, the
commandparameter will point to a function in charge of running our model.
The simplest version of a function for running the model would look like such:
Code
def runModel(self):
	'''
	Event: Runs model using SentimentAnalysis inherited module.
	'''
	# Run analysis
self.executeModel()Where self.executeModel() would be a module we inherited from the sentiment_analysis.SentimentAnalysis package upon our class declaration.
Still, we can extend the functionality of the runModel function by including additional valuable actions:
- Input validation: If the user does not insert any required columns, we can halt the execution and ask the user to input a valid field.
- Parameter confirmation: Before beginning with the execution, we can confirm the parameters to be used by inserting them in the text log we defined earlier.
- A timer: Of seconds defined by the user in the GUI after the parameters are confirmed and before the execution starts. This will give the user time to read the text log if required.
The complete implementation considering both points above would look like such:
Code
def runModel(self):
    '''
    Event: Performs initial input exception handling.
    Event: Runs model using SentimentAnalysis inherited module.
    '''
    if self.var_col1.get() == '':
        self.insertLog("PLEASE SELECT AT LEAST ONE AGGREGATION COLUMN IN COL1",
                        clear=True)

    elif self.var_target_col.get() == '':
        self.insertLog("PLEASE SELECT A TARGET COLUMN TO ANALYZE",
                        clear=True)

    elif self.var_target_id_col.get() == '':
        self.insertLog("PLEASE SELECT AN ID COLUMN",
                        clear=True)

    elif self.var_rdir.get() == '':
        self.insertLog("PLEASE SELECT AN INPUT DIRECTORY",
                        clear=True)

    elif self.var_wdir.get() == '':
        self.insertLog("PLEASE SELECT AN OUTPUT DIRECTORY",
                        clear=True)

    else:
        # Define text variables to print to textlog
        self.textvar_confirm = 'CONFIRMING VARIABLES'
        self.textvar_model = self.padStr('MODEL:', self.var_model.get())
        self.textvar_analysis = self.padStr('ANALYSIS:', self.var_analysis.get())
        self.textvar_operation = self.padStr('OPERATION:', self.var_operation.get())
        self.textvar_col1 = self.padStr('COL1:', self.var_col1.get())
        self.textvar_col2 = self.padStr('COL2:', self.var_col2.get())
        self.textvar_col3 = self.padStr('COL3:', self.var_col3.get())
        self.textvar_col4 = self.padStr('COL4:', self.var_col4.get())
        self.textvar_coltarget = self.padStr('TARGET:', self.var_target_col.get())
        self.textvar_colid = self.padStr('ID:', self.var_target_id_col.get())
        self.textvar_colrating = self.padStr('RATING:', self.var_rating_col.get())
        self.textvar_rdir = self.padStr('INPUT DIR:', self.var_rdir.get())
        self.textvar_wdir = self.padStr('OUTPUT DIR:', self.var_wdir.get())
        self.textvar_start = self.padStr('STARTING ANALYSIS IN', f'{float(self.var_wait_time.get())}s')
        self.textvar_stop = self.padStr('CONCLUDED ANALYSIS', 'ALL OK')

        # Confirm selected params to user
        self.insertLog(f"{self.textvar_confirm}\n",
                        f"{self.textvar_model}\n\n",
                        f"{self.textvar_analysis}\n",
                        f"{self.textvar_operation}\n",
                        f"{self.textvar_col1}\n",
                        f"{self.textvar_col2}\n",
                        f"{self.textvar_col3}\n",
                        f"{self.textvar_col4}\n",
                        f"{self.textvar_coltarget}\n",
                        f"{self.textvar_colid}\n",
                        f"{self.textvar_colrating}\n",
                        f"{self.textvar_rdir}\n",
                        f"{self.textvar_wdir}\n",
                        f"{self.textvar_start}\n\n")

        # Wait 5 seconds (for user to see params)
        time.sleep(float(self.var_wait_time.get()))

        # Run analysis
        self.executeModel()

        # Conclude analysis
        self.insertLog(f"{self.textvar_stop}\n\n")

return NoneThe complete set of widget definitions can be found at the _app.py module in the project repo.
Main function
A main function is used as the user’s contact point and as a trigger to execute the entire application. It’s meant to be run on its own and is not meant to be called from other packages or modules; we can think of the main function as the executable if we were to compile our code.
We want to create a simple script that initializes the application upon execution. It’s common practice to call this script main.py and the function main inside it.
Code
# Internal packages
import application

# Define main function
def main():
    app = application.MainApplication()
    app.mainloop()

if __name__ == '__main__':
main()This might seem a bit overkill for our specific purpose since our main function is brief and does nothing else than call our MainApplication class from our application package. We did this to keep our structure well organized: the frontend components stay inside the application folder, and the main function serves as the execution trigger.
Results
We can now try to run our frontend by executing main.py from the terminal with our virtual environment previously activated:
Code
cd sentiment-analysis-with-python/srcpython main.pyIf everything went right, we should end up with a GUI like such:
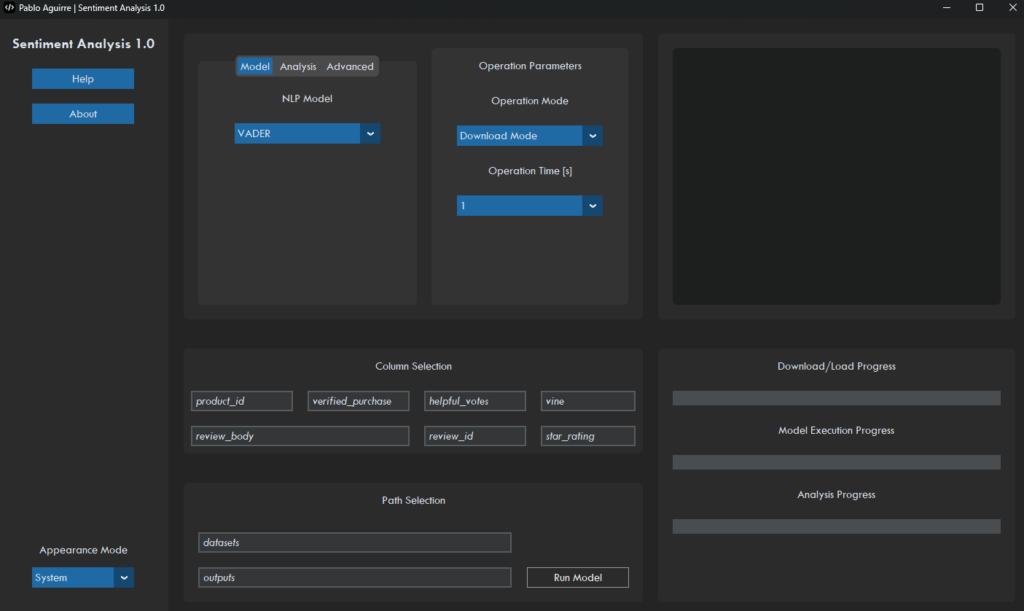
Conclusions
In this segment, we discussed what sentiment analysis is and the types of approaches for this technique. We also designed our application’s architecture, created our environment and included our project’s dependencies, defined our project’s directory structure and the interaction between packages & modules, included two configuration files using the .toml file format, and implemented a fully-fledged GUI using customtkinter and tkinter.
Now that we have a fully-fledged frontend for the user to interact with, we will design the backend over the next segment, starting with a dataset preprocessing module and wrapping up with the sentiment analysis package.