A filesystem is a method and data structure used by operating systems to manage how data is stored, organized and retrieved. Each operating system has a different filesystem with different logical rules and structures. Also, every external storage device has a filesystem included. Without this, data storage & data retrieval would be impossible.
File systems perform multiple functions. They are responsible for the following:
- User data management
- Space management
- Filenames
- Directories
- Metadata
- Access permission & restriction
- Data integrity
In this article, we will perform a general overview of the Linux directory tree starting from the root directory. We will then discuss the functions of each directory, their relation with the Linux Kernel and some important command line utilities for interacting with the filesystem. We will also perform some examples to help clarify if this is the first time we’ll be interacting with a Linux system.
We will be using WSL2 (Windows Subsystem for Linux) with Ubuntu, although this article applies for every other installation method and distribution. We will use the Windows terminal and bash commands to illustrate examples.
We will not cover the installation process for each of the components mentioned. Links for that purpose can be found below:
Overview
As stated earlier, a filesystem is a way for operating systems to interact with the data saved in hard drives. Each operating system family has its filesystem. Without going into much detail, we can mention the three main operating systems used today:
1. The Windows filesystem
The current Windows filesystem dates back to MS-DOS (Microsoft Disk Operating System), the command-line-based operating system initially used to run the Windows operating system. MS-DOS used letters to assign drives, which, back then, represented physical floppy disks. Some years later, internal hard drives were made available, and Microsoft designated the letter C for its internal hard drive. Currently, all Windows program files are installed on C:\Program Files.
2. The Linux filesystem
Linux is a UNIX-like operating system. The UNIX structure was fundamentally different from MS-DOS when created, and upon evolving, Linux adopted most of its conventions, including the filesystem. Linux, unlike Windows, has a hierarchical file structure; it contains a root directory and subdirectories. Also, Linux treats most of its components as files.
Interestingly, not all Linux distributions manage their directory structure equally. For example, a given distribution may use /media for mounting external drives, while another may use /run. Still, detailed information regarding directory structures for a given distribution can be found on its respective documentation site. Ubuntu’s filesystem structure can be found here.
3. The macOS filesystem
MacOS is more similar to Linux since it evolved from a similar UNIX-like operating system called BSD. It has the same hierarchical file structure, but the executables are not binary-compatible with Linux.
Preparing our environment
1. A word of caution
A word of caution before we begin: Some of the directories we’ll review, such as /boot, contain vital information for the Linux operating system to function correctly. We could easily break our system if we were to access them using root privileges and accidentally delete or modify their content.
An excellent option for avoiding messing up when tinkering around is to use a Virtual Machine; if we were to break anything, we could quickly restore the entire system from a snapshot or even do a fresh reinstall.
2. Choosing a distribution, an emulator and a shell
Given that we already have a Linux distribution installed, we can start by getting our hands on a terminal emulator and a shell. All distributions have at least one terminal emulator and one shell already installed. The most common shell is bash. As for terminal emulators, it depends on which family of distributions and which desktop manager we installed.
In our case, we’ll be using Ubuntu running on Windows WSL2. We’ll use the windows Terminal as our terminal emulator and zsh as our shell. The WSL2 setup process is out of the scope of this article but will be covered in the future.
We can confirm which shell is currently used by the system:
Code
ps -p $$Output
PID TTY          TIME CMD
128 pts/0    00:00:02 zsh
The output tells us we’re currently using the zsh shell, which has a process ID PID = 128 (not to worry, we’ll discuss processes more in-depth in the /proc section).
Ubuntu is a distribution based on Debian, so the filesystem will be similar for the two. Also, we’ll be able to use either the apt or the dpkg package managers for installing terminal utilities.
3. Installing two useful packages
Many of the packages we’ll be using already come preinstalled on Ubuntu. For the remaining ones, we can use the two package managers mentioned, depending on our preference:
apt: The native Ubuntu package manager.dpkg: The native Debian package manager.
For this example, we’ll be using Ubuntu’s apt.
We’ll first install the tree package for visualizing our directory structure in a tree-like diagram.
We can confirm we don’t yet have the tree package:
Code
treeOutput
Command 'tree' not found, but can be installed with:
sudo apt install tree
We can then install it:
Code
sudo apt install treeThe shell will prompt us for our sudo password since we’re installing this package for all users, including root (similar to Windows administrator permissions).
Upon inputting it, we can see what apt will install for us:
Output
The following NEW packages will be installed:
  tree
0 upgraded, 1 newly installed, 0 to remove and 0 not upgraded.
We can also install the htop command line utility used for monitoring and managing active processes, similar to the Task manager application on Windows.
Code
sudo apt install htopNow, we can begin exploring the Linux filesystem.
root (/)
This is the root directory and is the uppermost directory in the Linux system containing all the files, device data and system information.
If we’re executing our terminal emulator as a user different than root, the shell will start in /home/ourusername. This is the home directory for our user. We can confirm where we are by executing the following command:
Code
pwdOutput
/home/pabloagnckNow that we know where we are, we can change directories to the root directory by executing one of the following:
Code
cd ../..

pwdCode
cd /

pwdThe two periods .. in the first prompt allow us to change the directory to the relative parent directory we are currently in. If we do that two times with a slash / in between, we can change directories two times, arriving at the root directory /.
Output
/If we execute the tree command without any parameters, it will recursively go over every directory and file on / and list it. We don’t want that. Instead, we can specify a recursion level which will list only the immediate directories.
Code
tree -L 1Output
.
|-- bin -> usr/bin
|-- boot
|-- dev
|-- etc
|-- home
|-- lib -> usr/lib
|-- lost+found
|-- media
|-- mnt
|-- opt
|-- proc
|-- root
|-- run
|-- sbin -> usr/sbin
|-- snap
|-- srv
|-- sys
|-- tmp
|-- usr
`-- var
We can see that 21 directories were listed:
- The first directory
.denotes the current directory/. - The ones with the arrow symbol on the right
->denote symbolic links, orsymlinks. This means they are links pointing to another directory.
Each directory has an owner and a group assigned. If we recall, the file structure in Linux is hierarchical. It’s based on a set of standards called the FHS (File Hierarchy Standard); all directories immediately below / will have root as their owner. We can confirm this by using the list ls command with the single column output parameter -l:
Code
ls -lOutput
lrwxrwxrwx   1 root root       7 Oct 25 16:34 bin -> usr/bin
drwxr-xr-x   2 root root    4096 Apr 18  2022 boot
drwxr-xr-x  10 root root    3040 Jan 27 22:19 dev
drwxr-xr-x  79 root root    4096 Jan 27 22:19 etc
drwxr-xr-x   3 root root    4096 Dec 16 12:07 home
-rwxrwxrwx   1 root root 1939720 Dec 31  1969 init
lrwxrwxrwx   1 root root       7 Oct 25 16:34 lib -> usr/lib
lrwxrwxrwx   1 root root       9 Oct 25 16:34 lib32 -> usr/lib32
lrwxrwxrwx   1 root root       9 Oct 25 16:34 lib64 -> usr/lib64
lrwxrwxrwx   1 root root      10 Oct 25 16:34 libx32 -> usr/libx32
drwx------   2 root root   16384 Dec 16 12:06 lost+found
drwxr-xr-x   2 root root    4096 Oct 25 16:34 media
drwxr-xr-x   6 root root    4096 Dec 16 12:06 mnt
drwxr-xr-x   2 root root    4096 Oct 25 16:34 opt
dr-xr-xr-x 263 root root       0 Jan 27 22:19 proc
drwx------   4 root root    4096 Dec 16 23:31 root
drwxr-xr-x   7 root root     140 Jan 27 22:45 run
lrwxrwxrwx   1 root root       8 Oct 25 16:34 sbin -> usr/sbin
drwxr-xr-x   8 root root    4096 Oct 25 16:36 snap
drwxr-xr-x   2 root root    4096 Oct 25 16:34 srv
dr-xr-xr-x  11 root root       0 Jan 27 22:19 sys
drwxrwxrwt   3 root root    4096 Jan 27 22:19 tmp
drwxr-xr-x  14 root root    4096 Oct 25 16:34 usr
drwxr-xr-x  13 root root    4096 Oct 25 16:35 var
From left to right:
- The first column denotes if we’re dealing with a file, folder, link or block, as well as the permissions:
- The first character can be
-,d,lorb, denoting files, directories, links or blocks. - The second, third and fourth characters denote permissions for the owner:
rfor read,wfor write,xfor execute. If we’re missing a character on any given field, that specific permission is not granted. - The fourth, fifth and sixth characters denote the
grouppermissions in the same format as above. - The last three characters denote permissions for anyone else in the same format as before.
- The first character can be
- The third column denotes the
owner. - The fourth column denotes the
group. - The fifth column denotes the size in bytes.
- The sixth column denotes the last update date and time.
- The last column denotes the name of the file, directory or link.
We can read further documentation on the ls command by consulting its manual pages, using the man command:
Code
man lsAs we go over the directory structure, we will notice that, as opposed to Windows, the directory & system file names are intuitive; they’re acronyms for actual names describing their purpose. This is also part of the UNIX philosophy and applies not just to the directory structure but to commands and file naming conventions.
/bin
The /bin directory stands for binary and contains the most basic executables such as ls, man and cat. In modern distributions, it’s usually linked to /usr/bin.
We can list the contents of the /bin directory. The output will be large since our Linux system has multiple executables already installed. We can truncate our output to the ten first entries by piping our ls output into the head command:
Code
cd /bin

ls | head -10Output
2to3-2.7
NF
X11
[
aa-enabled
aa-exec
aa-features-abi
add-apt-repository
addpart
addr2line
We can also filter the ls output to look for a given executable, in this case, the actual ls:
Code
ls lsOutput
ls/boot
The /boot directory contains everything necessary for the operating system to boot. Here, we can find the following:
- The bootloader
- The initial ram system
initramfs - The Linux Kernel files
We need to be careful with this directory since deleting or modifying files could cause our system to stop working.
/dev
The /dev directory stands for devices and contains file representations of all virtual and physical devices on our system. These include but are not exclusive to:
- External hard drives (
/sda) - Internal hard drives (
/sda) - RAM (
/ram) - USB device topologies (
/bus/devices) - Standard input and standard output (
/stdin,/stdout) - Other serial ports
- Every other peripheral we connect to our system
This can be confusing at first, but we must remember that for Linux, almost anything is represented by a file (even directories).
We can get all the RAM devices on /dev:
Code
cd /dev

ls -l ram*Output
brw------- 1 root root 1,  0 Jan 28 14:02 ram0
brw------- 1 root root 1,  1 Jan 28 14:02 ram1
brw------- 1 root root 1, 10 Jan 28 14:02 ram10
brw------- 1 root root 1, 11 Jan 28 14:02 ram11
brw------- 1 root root 1, 12 Jan 28 14:02 ram12
brw------- 1 root root 1, 13 Jan 28 14:02 ram13
brw------- 1 root root 1, 14 Jan 28 14:02 ram14
brw------- 1 root root 1, 15 Jan 28 14:02 ram15
brw------- 1 root root 1,  2 Jan 28 14:02 ram2
brw------- 1 root root 1,  3 Jan 28 14:02 ram3
brw------- 1 root root 1,  4 Jan 28 14:02 ram4
brw------- 1 root root 1,  5 Jan 28 14:02 ram5
brw------- 1 root root 1,  6 Jan 28 14:02 ram6
brw------- 1 root root 1,  7 Jan 28 14:02 ram7
brw------- 1 root root 1,  8 Jan 28 14:02 ram8
brw------- 1 root root 1,  9 Jan 28 14:02 ram9
Most of these block files don’t contain any information but can be written by programs.
/etc
The /etc directory stands for etcetera and contains all system-wide configuration files. It also contains startup scripts. Applications installed for all users will have system-wide settings in this directory.
We can display the head of the /etc directory:
Code
ls | head -10Output
PackageKit
X11
adduser.conf
alternatives
apache2
apparmor
apparmor.d
apport
apt
bash.bashrcOne important thing to remember is that this directory belongs to the root user. That means we cannot edit files inside the /etc directly within our user shell without using the super user do sudo command.
It is also not recommended to modify the settings of conventional executables here since they will most likely get overwritten with an update. That’s what the /home/.config directory is for, which we’ll visit shortly.
The /etc directory is also extremely important when managing users in our Linux system since here; we will find the sudoers configuration file in charge of managing user credentials and permissions.
If we were to add a new user to our system, we would have to login as root and include username, user password and permissions here (not directly, but by using the visudo command, which in turn writes to the sudoers file).
We can take a look at our sudoers file to explore its contents:
Code
sudo cat sudoersWe will skip some lines and refer to the User privilege specification section:
Output
# User privilege specification
root    ALL=(ALL:ALL) ALL

# Members of the admin group may gain root privileges
%admin ALL=(ALL) ALL

# Allow members of group sudo to execute any command
%sudo   ALL=(ALL:ALL) ALL
/home
The /home directory contains a collection of the non-root user’s folders. When a user is created, a directory with its username is also generated on /home. The username folder is created with the username as the owner and the username group as the group. This makes this folder accessible by the user without needing root permissions.
We can list the contents of the /home directory:
Code
cd /home

tree -L 1Output
.
`-- pabloagnck
Since we only have one non-root user set up, we are shown the current directory and the username folder.
If we go one level deeper, we can see the contents of the user’s home folder:
Code
cd pabloagnck/

ls -laHere we use the ls command along with the la parameters. As we have seen, the list parameter l lists the content in a columnar format, while the all parameter a lists all content, including hidden files and folders. This is important because usually, the user’s home folder contains user-level configuration folders and files hidden by default (prepended by a dot .).
Output
drwxr-x--- 5 pabloagnck pabloagnck  4096 Jan 27 22:46 .
drwxr-xr-x 3 root       root        4096 Dec 16 12:07 ..
-rw------- 1 pabloagnck pabloagnck  1182 Dec 16 23:22 .bash_history
-rw-r--r-- 1 pabloagnck pabloagnck   220 Dec 16 12:07 .bash_logout
-rw-r--r-- 1 pabloagnck pabloagnck  3771 Dec 16 12:07 .bashrc
drwxr-xr-x 9 pabloagnck pabloagnck  4096 Jan 28 14:35 .cache
drwxr-xr-x 8 pabloagnck pabloagnck  4096 Dec 17 13:46 .config
drwxr-xr-x 5 pabloagnck pabloagnck  4096 Dec 16 23:33 .local
-rw-r--r-- 1 pabloagnck pabloagnck     0 Dec 16 12:07 .motd_shown
-rw-r--r-- 1 pabloagnck pabloagnck 91419 Dec 17 11:42 .p10k.zsh
-rw-r--r-- 1 pabloagnck pabloagnck   807 Dec 16 12:07 .profile
-rw------- 1 pabloagnck pabloagnck   184 Dec 16 23:36 .python_history
-rw-r--r-- 1 pabloagnck pabloagnck    10 Dec 16 23:39 .shell.pre-oh-my-zsh
-rw-r--r-- 1 pabloagnck pabloagnck     0 Jan 27 22:46 .sudo_as_admin_successful
-rw------- 1 pabloagnck pabloagnck  5579 Dec 17 13:44 .viminfo
-rw-r--r-- 1 pabloagnck pabloagnck   165 Dec 17 13:40 .wget-hsts
-rw-r--r-- 1 pabloagnck pabloagnck  1060 Dec 17 13:48 .zshenv
If we pay attention, we can notice three things:
- As usual, the first file we get is the current directory folder denoted by
., but we also get a second file,... This is the parent directory file; in this case, since our parent directory is/home, its owner and group areroot. - We have several hidden files, each denoting a configuration file for a specific application.
- We also have several hidden folders, each denoting a configuration folder, the cache folder, or the libraries folder (inside
.local/) containing user-wide libraries and application settings.
By default, our system includes all these files directly in /home/pabloagnck, but this can become a mess quickly, so the best practice is to try to have every configuration file live inside the .config directory (we can not do this by simply dragging the files inside .config. Instead, we need to specify a separate variable which is out of the scope of this article). This directory is analogous to /etc for system-wide configuration. In fact, most applications usually include a user-level configuration file template and a system-wide one as well.
As we can see, we don’t have any Desktop, Documents, or Downloads folders. This is because we’re using WSL2, which does not need all these home directories.
One important thing to remember is that a typical user will not be able to see other users’ content without superuser permission.
/lib, /lib32, /lib64
The /lib, /lib32 and /lib64 stand for libraries and contain files that applications can use to perform various functions. They hold the shared libraries our system’s executables will need. /lib/systemd/system, for example, hosts unit files used in Linux services, a crucial component in any Linux system.
Typically, we will have two additional /lib directories apart from /lib:
/lib32: Libraries for 32-bit programs/lib64: Libraries for 64-bit programs
As with the /bin directory, the /lib directories will be symbolically linked to their corresponding /usr/lib directory:
Code
cd /

ls -l lib*Output
lrwxrwxrwx 1 root root  7 Oct 25 16:34 lib -> usr/lib
lrwxrwxrwx 1 root root  9 Oct 25 16:34 lib32 -> usr/lib32
lrwxrwxrwx 1 root root  9 Oct 25 16:34 lib64 -> usr/lib64
lrwxrwxrwx 1 root root 10 Oct 25 16:34 libx32 -> usr/libx32
/lost+found
The /lost+found directory contains pieces of broken files after a system crash. It also includes programs that were already unlinked (i.e. their name had been erased) but still opened by some process when the system halted. Most distributions contain a predefined space in /lost+found for the filesystem check utility fsck to deposit unlinked files.
/media
The /media directory contains the files representing the mounted drives. If we were to attach an external hard drive to our operating system, /media would be one of the options where the system could mount it. Each distribution handles this differently, but it has become the standard for the system’s automatic mounts.
In short, it serves as a mount point for system-mounted devices, but we can also use it to mount devices manually.
We can connect an external hard drive in our system to exemplify (currently, WSL2 does not support flash drive mount, only external hard drives).
For our case, since we’re using WSL2, we’ll mount our device to our subsystem first:
Code
# First, we invoke an elevated PowerShell instance
start-process PowerShell -verb runas

# Then we get the current Windows mount Point of our USB device
GET-CimInstance -query "SELECT * from Win32_DiskDrive"Output
DeviceID           Caption                         Partitions
--------           -------                         ----------
\\.\PHYSICALDRIVE1 Microsoft Virtual Disk          1
\\.\PHYSICALDRIVE0 NVMe SAMSUNG MZVL21T0HCLR-00B00 5
\\.\PHYSICALDRIVE2 WD Elements 25A3 USB Device     1
We’re looking for a WD External Hard Drive, so we mount the corresponding device to our subsystem:
Code
wsl --mount \\.\PHYSICALDRIVE2 --bareWe use the --bare flag since the NTFS filesystem is not natively supported by Linux.
Output
The operation completed successfully.We can confirm that our device exists in our WSL2 subsystem:
Code
lsblkOutput
NAME   MAJ:MIN RM   SIZE RO TYPE MOUNTPOINTS
sdd      8:48   0   7.3T  0 disk
|-sdd1   8:49   0    16M  0 part
`-sdd2   8:50   0   7.3T  0 part
This tells us that our device exists as sdd and has two partitions available: sdd1 and sdd2.
Since the filesystem for our external hard drive is NTFS, we will need two additional packages:
Code
sudo apt install ntfs-3g fuse3We will then need to mount the device manually. When mounting devices in Linux, it’s important to choose a directory we create; if we mount it directly at /media, the whole directory will become the mount point, and we don’t want that. We instead want to isolate the mounted device by creating a folder as mount point:
Code
cd /media

sudo mkdir WDWe already know the device and partition names, thus can proceed as such:
Code
cd WD

sudo mount -t ntfs /dev/sdd2 .The dot at the end of the statement tells the system to mount our device in the current directory /media/WD. We need to mount using sudo since /media is a root folder, and the mount command also requires superuser permissions.
We can confirm that our device was mounted correctly:
Code
df -aThOutput
/dev/sdd2 fuseblk 7.3T 74G 7.3T 1% /media/WDWe can also list the contents of our mounted partition:
Code
ls -laOutput
drwxrwxrwx 1 root root    0 Jan 25 13:47 '$RECYCLE.BIN'
drwxrwxrwx 1 root root 4096 Jan 26 11:25  .
drwxr-xr-x 3 root root 4096 Jan 28 17:48  ..
drwxrwxrwx 1 root root    0 Jan 26 11:53 'System Volume Information'
drwxrwxrwx 1 root root    0 Jan 25 10:47 'Transfer to QNAP'
All folders have root as owner and group since we mounted using sudo permissions.
Finally, we must remember to unmount our device. If we’re still on /media/WD, we need to change directories first:
Code
cd ..

sudo umount WDIf we want to remove this mount point, we can do so (an word of caution here, since the remove rm command with the recursive -r flag will wipe out the entire directory along with all the subdirectories and files inside of it):
Code
sudo rm -r WDWe also have to unmount the device from PowerShell:
Code
wsl --unmount \\.\PHYSICALDRIVE2Output
The operation completed successfully.This was too much work for mounting an external drive to our Linux system because we’re using a subsystem which has limitations. Still, if we’re working on a Linux machine, this process is straightforward, specifically on user-friendly distributions such as Ubuntu, and can be further customized using configuration files.
/mnt
The /mnt directory stands for mount and was the original mounting point for external devices. Nowadays, most distributions use /media instead, although /mnt is still a temporary mount point.
WSL2 mounts devices on /mnt if Linux natively supports their filesystem.
/opt
The /opt directory stands for optional and contains installed software from external sources. We can also use this directory to host the software we create.
/proc
The /proc directory stands for processes and contains information about system processes. Every process executed will have a directory inside /proc and be assigned a unique pid (process ID). Continuing with the UNIX “almost everything is treated as a file” philosophy, processes are no exception.
This directory is extremely helpful when developing software in a Linux environment. We can see which processes are firing and obtain detailed information about their nature.
We can list the content of our /proc directory:
Code
cd /proc

ls -lOutput
dr-xr-xr-x  9 root       root                     0 Jan 27 22:19 1
dr-xr-xr-x  9 pabloagnck pabloagnck               0 Jan 27 22:19 10
dr-xr-xr-x  9 pabloagnck pabloagnck               0 Jan 27 22:41 13
dr-xr-xr-x  9 root       root                     0 Jan 27 22:41 4
dr-xr-xr-x  9 pabloagnck pabloagnck               0 Jan 28 00:22 552
dr-xr-xr-x  9 root       root                     0 Jan 27 22:41 8
dr-xr-xr-x  9 pabloagnck pabloagnck               0 Jan 27 22:19 88
dr-xr-xr-x  9 root       root                     0 Jan 27 22:41 9
dr-xr-xr-x  9 pabloagnck pabloagnck               0 Jan 27 22:41 90
...
We can view & monitor the active processes by using the htop utility we installed earlier:
Code
htopOutput
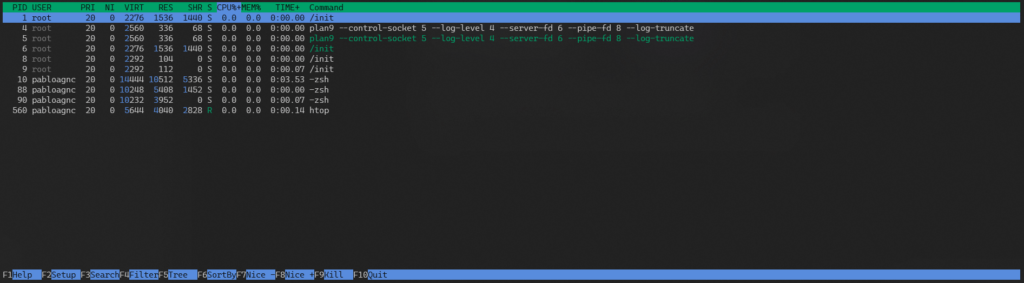
htopWe can see that the system is currently running ten processes. Looking at the first column, we can identify each process by its respective PID.
Processes 1 through 9 are being run by root, while the remaining ones are being run by our user.
To exit the htop utility, we use the q key. If we go back to /proc and look for process 88, we can see a directory. We then cd into it and list its contents:
Code
cd /proc/88

ls -lOutput
total 0
-r--r--r--  1 pabloagnck pabloagnck 0 Jan 28 00:32 arch_status
dr-xr-xr-x  2 pabloagnck pabloagnck 0 Jan 28 00:32 attr
-r--------  1 pabloagnck pabloagnck 0 Jan 28 00:32 auxv
-r--r--r--  1 pabloagnck pabloagnck 0 Jan 28 00:32 cgroup
--w-------  1 pabloagnck pabloagnck 0 Jan 28 00:32 clear_refs
-r--r--r--  1 pabloagnck pabloagnck 0 Jan 27 22:41 cmdline
-rw-r--r--  1 pabloagnck pabloagnck 0 Jan 27 22:41 comm
-rw-r--r--  1 pabloagnck pabloagnck 0 Jan 28 00:32 coredump_filter
-r--r--r--  1 pabloagnck pabloagnck 0 Jan 28 00:32 cpuset
lrwxrwxrwx  1 pabloagnck pabloagnck 0 Jan 28 00:32 cwd -> /
-r--------  1 pabloagnck pabloagnck 0 Jan 28 00:32 environ
lrwxrwxrwx  1 pabloagnck pabloagnck 0 Jan 27 22:41 exe -> /usr/bin/zsh
As displayed, there is a link to the binary executable /usr/bin/zsh being run, which makes sense since we’re using the zsh shell for this precise action.
One important thing to know is that the first process is the /init process. This process refers to the initialization system and is in charge of creating the following processes. It is up from boot to shut down and will permanently be assigned a PID of 1 since it will always be the first process to start.
We can view the contents of any file by using the concatenate command cat:
Code
cat cmdlineOutput
-zsh%/root
The /root directory is the home directory for the root user. It contains root user configuration folders & files.
We cannot simply change directories into /root since we need root permissions. To be able to view the contents, we are going to change to the root shell by using the superuser command:
Code
sudo suWe need to be extremely careful since we are now in the root shell and can delete virtually anything without the system prompting us for a password.
We can now change directories to the root home directory:
Code
cd /root

ls -lOutput
In our case, we don’t have anything since we have not configured anything root user-related.
To exit the root shell, we type exit and return to the user shell.
/run
The /run directory is somewhat new and has different uses depending on each distribution. It is a tempfs filesystem meaning it runs in ram and is deleted upon system shutdown. This is why some distributions use it to mount devices such as external hard drives.
It usually contains information regarding which users are currently logged in and active daemons running in our system, among others.
/sbin
The /sbin directory stands for system binaries and, similar to the /bin directory, contains executables that the system administrator would use. /sbin is often a link to /usr/sbin.
Differences between /bin and /sbin have a historical component as well as a functional one; historically, /sbin used to contain statically linked executables, thus having fewer library dependencies. Functionally, /sbin includes utilities typically only run by a sysadmin with root privileges and /bin contains everything else. On some systems, non-root users don’t have /sbin in their path, so they must use the full path to run these tools.
We can find executables such as adduser, addgroup, chgpasswd, chroot, fsck, and other utilities typically used by a system administrator.
/snap
The /snap directory is specific to Linux distributions using the systemd init system since it contains all packages related to Snap, a software packaging and deployment system developed by Canonical. Snap packages are self-contained and run differently than conventional executables.
/srv
The /srv directory stands for service and contains files related to web or FTP servers. If we were running a server on our Linux system, it would serve as an access point for external users. It can be isolated from the rest of the directories by hosting it in a different partition, making file sharing and accessing by external users safe.
The /srv directory is usually empty and not commonly used for most distributions, although there are exceptions such as OpenSUSE, which uses it as the default for web servers.
/sys
The /sys directory stands for system and serves as a direct way to interact with the kernel. It contains information about devices, drivers and kernel features running on our system. As with /run, it resides on RAM and is deleted when we shut down the system. Its content structure is very similar to the /proc directory, although the first one is better organized.
We can compare the contents of both directories:
Code
cd /sys

tree -L 1Output
.
|-- block
|-- bus
|-- class
|-- dev
|-- devices
|-- firmware
|-- fs
|-- kernel
`-- module
Code
cd /proc

tree -L 1Output
.
|-- 1
|-- 1101
|-- 1102
|-- 1103
|-- 1106
|-- 1162
|-- 1164
|-- 1165
|-- 2070
|-- 2114
|-- 4
|-- acpi
|-- buddyinfo
|-- bus
|-- cgroups
|-- cmdline
|-- config.gz
|-- consoles
|-- cpuinfo
|-- crypto
|-- devices
|-- diskstats
|-- dma
|-- driver
|-- execdomains
|-- filesystems
|-- fs
|-- interrupts
|-- iomem
|-- ioports
|-- irq
|-- kallsyms
|-- kcore
|-- key-users
...
/tmp
The /tmp directory stands for temporary and contains files temporarily stored by applications. It also resides on RAM and is deleted upon system shutdown.
/usr
The /usr directory stands for Unix System Resources and contains all user binaries, libraries and documentation for the user applications, as opposed to the /bin directory used by the system and root user.
As we discussed, directories such as /usr/bin, /usr/lib and /usr/sbin are linked to /bin, /lib and /sbin, respectively. This is done for compatibility purposes.
We can take a look at its contents by executing the tree command:
Code
cd /usr

treeOutput
.
|-- bin
|-- games
|-- include
|-- lib
|-- lib32
|-- lib64
|-- libexec
|-- libx32
|-- local
|-- sbin
|-- share
`-- src
We can see we have 12 folders:
- The
binfolder contains all user executables. - The
gamesfolder contains installed user games. - The
includefolder includes the header files for C compilers such asstdio.handstdlib.h. - The
lib,lib32andlib64folders contain libraries required by the applications installed on/usr/binor/usr/sbin - The
libexecfolder contains system daemons and system utilities executed by other programs. - The
libx32folder contains software using the x86-64 instruction set but with 32-bit pointer size. - The
localfolder contains user applications installed by source code. - The
sbinfolder contains system binaries. - The
sharefolder contains larger user applications. - The
srcfolder contains source code applications, such as the Kernel source and headers.
The /usr directory is used differently depending on our distribution. It is also used differently between developers; one developer might adhere to the FHS standards, while another might choose a different folder to install his application.
/var
The /var directory stands for variable and contains directories and files expected to grow in size. A good example would be the /var/log folder, which includes system and user logs. Also, some web servers, such as Apache place can place their files here.
We can display the contents in the /var directory:
Code
cd /var

treeOutput
.
|-- backups
|-- cache
|-- crash
|-- lib
|-- local
|-- lock -> /run/lock
|-- log
|-- mail
|-- opt
|-- run -> /run
|-- snap
|-- spool
`-- tmp
We can view the contents of our apt package manager log files:
Code
cd /var/log/apt

ls -lOutput
total 112
drwxr-xr-x 2 root root    4096 Jan 28 17:50 .
drwxrwxr-x 7 root syslog  4096 Dec 16 12:07 ..
-rw-r--r-- 1 root root   20324 Jan 28 17:50 eipp.log.xz
-rw-r--r-- 1 root root   26247 Jan 28 17:50 history.log
-rw-r----- 1 root adm    50511 Jan 28 17:50 term.log
If we want to see the command history, we can concatenate history.log:
Code
cat history.logOutput
...
Start-Date: 2023-01-27  22:47:18
Commandline: apt install tree
Requested-By: pabloagnck (1000)
Install: tree:amd64 (2.0.2-1)
End-Date: 2023-01-27  22:47:19

Start-Date: 2023-01-28  17:50:29
Commandline: apt install fdisk
Requested-By: pabloagnck (1000)
Install: fdisk:amd64 (2.37.2-4ubuntu3), libfdisk1:amd64 (2.37.2-4ubuntu3, automatic)
End-Date: 2023-01-28  17:50:30
The command history for apt is displayed in ascending order.
We can also filter by specific date by piping our concatenation into a grep -A command:
Code
cat history.log | grep -A 10 '2023-01-28'The -A n flag displays n lines posterior to our date match.
Output
Start-Date: 2023-01-28  17:50:29
Commandline: apt install fdisk
Requested-By: pabloagnck (1000)
Install: fdisk:amd64 (2.37.2-4ubuntu3), libfdisk1:amd64 (2.37.2-4ubuntu3, automatic)
End-Date: 2023-01-28  17:50:30
As we can see, this directory is extremely useful for any system administrator since it shows, in detail, each user’s history log, among many other things.
Conclusions
We’ve reviewed the entire Linux filesystem and the functions each directory serves. At first, it might seem intimidating and confusing, but the reality is that the Linux filesystem is more optimal than other filesystems, such as Windows’s.
Getting familiarized with the Linux folder structure is vital if we are to learn more advanced subjects. When getting more involved in the Linux ecosystem, we’ll inevitably spend a fair amount of time on these directories.
Lastly, this was just an overview, but if we’d like to get more intimate with the Linux filesystem, we can always consult the official documentation. The Linux community is vast, active and heavily involved. We can use forums as an alternative way to learn or stick with using man, the masterfully crafted utility providing manual pages for virtually any package out there.